
Like any computer, your Mac can be vulnerable to Wi-Fi issues and dropped connections. In this article, we show you the steps to fix a number of Mac Wi-Fi problems. We cover adjusting your packet size, resetting the PRAM and SMC, configuring the DNS, changing location, resetting the Wi-Fi configuration, and more.
- How to Diagnose Your Mac’s Wi-Fi Problems
- How to Fix Mac Wi-Fi Not Working After Sleep-Wake Cycle
- Restart Your Mac
- Disconnect Your USB and Wireless Signal Devices
- Reset the NVRAM/PRAM and SMC
- Reconfigure the DNS
- Adjust Packet Size
- Change Network Location and Renew DHCP Lease
- Forget Your Wi-Fi Network
- Check for System Software Updates
- Frequently Asked Questions
Also read: Mac Unable to Communicate With Your Printer? Try These Fixes
How to Diagnose Your Mac’s Wi-Fi Problems
A good place to start when looking at Mac Wi-Fi problems and dropping or lost connections is to diagnose the issue. The native macOS Wireless Diagnostics tool can be quite helpful. If you are experiencing more than just Wi-Fi issues, it may be a good idea to learn how to fix an unresponsive Mac.
- Open the macOS Wireless Diagnostics tool using Spotlight search, or quickly launch it by holding down the Option key and opening the Wi-Fi settings within Control Center as shown below.

- You can follow the wizard here for some basic pointers, but there’s a little-known set of reports and analytics within the “Window” drop-down in the Menu Bar. A useful report here is “Performance.” It will open a graph that shows the transmission rate, signal quality, and noise level on your Wi-Fi network.

- In many cases, the transmission rate and signal quality impact each other. You can improve your signal by positioning your Mac closer to your router. It’s a simple solution to a sometimes complex problem. The performance report displayed below depicts a steady and consistent Wi-Fi connection.

Tip: if your noise levels are high or spiking, try finding a better Wi-Fi channel. Alternatively, log in to your router settings through your browser and change from the 2.4GHz band to the 5GHz band.
How to Fix Mac Wi-Fi Not Working After Sleep-Wake Cycle
This is a common problem for Mac users. After the computer wakes from sleep, the Wi-Fi won’t work or the connection keeps dropping.
- One possible solution involves going to “System Preferences -> Network -> Wi-Fi.” On Ventura, it’s “System Settings -> Wi-Fi.”

- Click the “Advanced” button in the bottom-right corner.
- On the next screen, remove every network in the list by clicking them with your cursor.
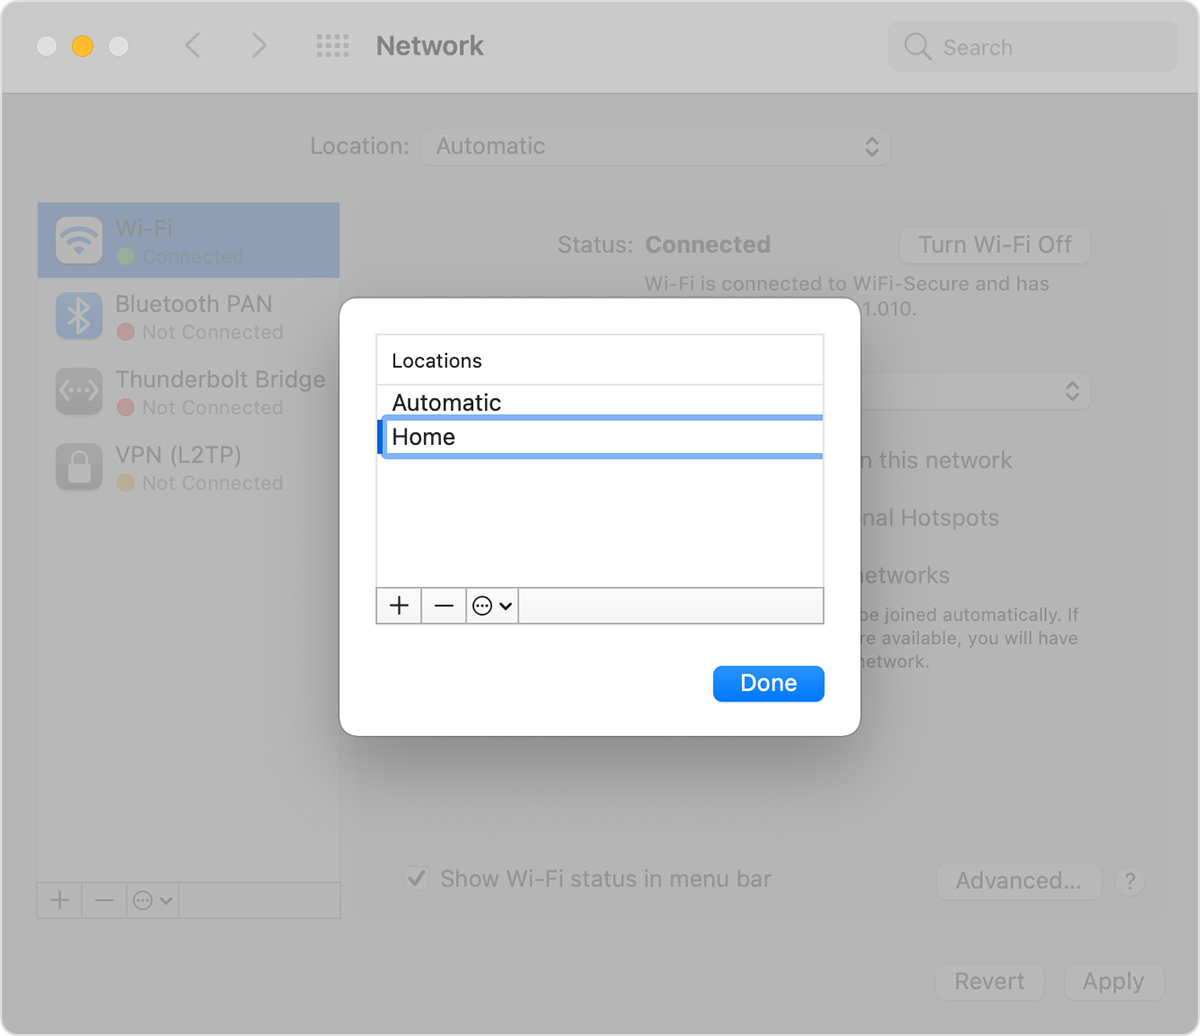
- Hit the “OK” button after selecting the networks you want to remove, then click the “Locations -> Edit Locations” drop-down menu in the main Network screen. In Ventura, you’ll need to use the command
networksetupin the Terminal app to configure network location.

- Choose the plus “+” icon and give the new location a name of your choice. Click “Done” to use this location from now on.

Also read: Is Your MacBook Trackpad Not Working? Here Are the Fixes!
- Reconnect to your home Wi-Fi network and check whether this does indeed fix this frustrating Mac Wi-Fi problem.
How to Fix Common Mac Wi-Fi Problems
Below are several different solutions to try when your Mac won’t connect to Wi-Fi. They’re not in any specific order, so feel free to choose one that looks like it may help with your issues. If the first option you try doesn’t work, move on to another. These solutions apply to both Monterey and Ventura.
Restart Your Mac
Before getting into more complex solutions, try restarting your Mac to see whether this resolves the problems with your Wi-Fi dropping. If your Mac connects to the Wi-Fi after it restarts, it could be a temporary glitch.
Click on the Apple logo in the Menu Bar and select the item labeled “Restart” from the drop-down list. Follow the onscreen prompt to restart your Mac.

Also read: How to Kick Unwanted Connections Off Your Wi-Fi
Disconnect Your USB and Wireless Signal Devices
This is a simple troubleshooting method. You can get things back up and running by disconnecting any USB and USB-C devices on a temporary basis. There’s a simple reason why this could be a solution: some USB devices emit a wireless signal that can interfere with your connection.

Devices such as USB hubs can also disable the Wi-Fi port. This is similar to how a plugged-in Ethernet cable can disable your Wi-Fi connection. First try disconnecting your USB devices one by one to see whether the Wi-Fi connection comes back.
Also read: What’s the Difference Between “Access Point” and “Repeater” Modes on Routers?
Reset the NVRAM/PRAM and SMC
You can also try resetting the Parameter Random Access Memory (PRAM) / Non-Volatile Random Access Memory (NVRAM) and the System Management Controller (SMC).
These are the areas of your Mac that control basic operations that are critical for basic system functions. However, you won’t be able to do this reset on an Apple Silicon machine, as it doesn’t have an SMC. The equivalent is to turn the machine off, wait 30 seconds, then boot it back up.
For an Intel machine, start with the PRAM. There are five straightforward steps:
- Press and hold the Power button on your Mac to completely shut it off. You should wait until the screen goes dark and the fans stop spinning. At this point, power your Mac on again.

- Once you see the startup routine and sound, press and hold the Command + Option + P + R keys. Hold them until you hear the startup sound and see the Apple logo.

- Once you release the keys, the PRAM/NVRAM will be reset.
As for SMC, the process will vary depending on whether your Mac is a desktop or laptop and whether it has a removable battery. Look up your particular Intel or Apple Silicon machine to find which method you should follow to reset the SMC.
Also read: Everything About Apple Silicon and the M1 Chip That You Need To Know
Reconfigure the DNS
In layman’s terms, the Domain Name Server (DNS) converts IP addresses into readable web addresses (such as “maketecheasier.com”). It’s akin to a phone book of sorts for the Internet. This step will only address Internet connectivity issues, assuming your Mac can connect to your Wi-Fi network.
However, sometimes the given DNS for a service provider won’t work properly. You can test this theory with a free public DNS. There are a few providers, but Google and Namecheap have solid solutions. Here, we’re using Namecheap’s public DNS or 198.54.117.10. Follow these steps to reconfigure the DNS.
- Head to the Wi-Fi screen, select a Wi-Fi network and click the “Details” button.
- Select the DNS tab from the list of menu items on the left.

- From here, click the “+” icon to add a new DNS server, then the IP address. When you’re ready, click the “OK” button, then monitor your connection for any issues.

Also read: How to Merge Two macOS Accounts Into One
Adjust Packet Size
If only some pages are failing to load, it could be down to the number of packets (or “data”) that can transmit across the network. Adjust the value to let all sites load without fail.
- Head to “System Preferences -> Network -> Advanced,” or if you upgraded to the latest OS version, go to “System Settings -> Wi-Fi -> Details.” Next, select the “Hardware” tab.

- You’ll see two options. First, change the “Configure” setting from “Automatically” to “Manually” to alter the MTU setting.
- Choose “Custom” for “MTU.” For the MTU value underneath, enter “1453” and confirm your changes.

You’ll have to monitor the performance and connection, much like reconfiguring the DNS, to ascertain whether these changes resolve your problems.
Also read: 9 of the Best Dynamic DNS Providers You Can Use for Free
Change Network Location and Renew DHCP Lease
Sometimes the automatic location determined by your Mac isn’t correct. In these cases, we can set up a custom location and settings and renew the Dynamic Host Configuration Protocol (DHCP) lease and Internet Protocol (IP) address. DHCP is a protocol to help you arrange IP addresses, so changing it can help make sure traffic goes to the right location.
- Enter the Network panel within System Preferences and click on the drop-down menu labeled “Locations.”
- Select “Edit Locations.”

- Click the “+” icon and give your location a new name. It will not affect the results, so it can be anything you would like. In this example, we have simply named the new location “Test.” When you are finished adding a new location, press the “Done” button.

- You’ll notice that “No IP Address” appears under the Wi-Fi option in the panel on the left.

- Head to the “Advanced” screen and select the “TCP/IP” tab. Click the “Renew DHCP Lease” button to assign a new IP address to your machine. To complete this action, follow the on-screen prompt by selecting “Apply.”

Browse the web and monitor your performance and connection before trying another option in this list.
Also read: How to Hide Files, Folders and Desktop Icons on Mac
Forget Your Wi-Fi Network
If you are having trouble establishing a reliable connection to a Wi-Fi network try “forgetting” the network before reconnecting to it. Your Mac will always attempt to automatically connect to Wi-Fi networks it has previously connected to. If the attempt to connect fails, your Mac will keep trying with no success. Break this endless cycle by forgetting the network that you are trying to connect to.
- Navigate to the Network or Wi-Fi tab again and click the “Details” button to the right of the name of the network you are trying to connect to.


- Select the button that reads “Forget This Network.” When you attempt to reconnect to the network you may be asked to enter network credentials.
Check for System Software Updates
Apple frequently issues updates to macOS addressing some of the most common network connectivity issues. If you are having difficulty maintaining a stable Wi-Fi connection, it is a good idea to keep your Mac up to date.
- Open “System Preferences -> Software updates.” If you’re on the latest OS version, go to “System Settings -> General -> Software Update.”

- Click on the button labeled “Update Now” or “Upgrade Now” to install the latest update.

Also read: How to AirPlay to Mac From iPhone
Frequently Asked Questions
Are there any third-party tools that can help me resolve Mac Wi-Fi problems?
The Mac’s native tools are often perfect for diagnosing Wi-Fi problems, so we wouldn’t suggest you go premium as a matter of course. However, you could analyze your network using solutions such as NetSpot or WiFi Explorer. Most solutions will be quick to implement, so we only recommend a third-party solution if you have long-term issues that are difficult to root out.
Should I buy a new router to fix Mac Wi-Fi problems?
In many cases, you won’t need to buy a new router. alterning your settings will resolve most problems. However, you may want to extend your connection through a Wi-Fi extender or Mesh network. If you live in a large house or have thick walls, this is a good idea anyway, regardless of whether you have problems. If you are still experiencing problems, try unplugging your router, then wait at least 30 seconds before plugging it back in.
How can I troubleshoot Mac Wi-Fi problems if I cannot locate Wi-Fi settings in the Menu Bar?
If the Wi-Fi status indicator is missing from the Menu Bar on your Mac, you may have removed it by accident or while customizing the Menu Bar. To add it back, simply drag the Wi-Fi indicator out of Control Center and back into the Menu Bar to quickly access Wi-Fi settings in just one click.
Image credit: Wes Hicks via Unsplash. All screenshots by Brahm Shank.
Our latest tutorials delivered straight to your inbox