
Track Changes is a built-in option in Microsoft Word that allows you to monitor changes made to a document. Suggesting Mode is a similar feature in Google Docs. It’s especially useful as a collaboration tool, but you can also use it to track changes in your own documents, especially if you’re working with different versions of the same document. This guide demonstrates how to unlock the power of Track Changes in Word and Google Docs to enable efficient document revision and review.
Good to know: learn how to use Microsoft Word to create a fillable form.
- How to Enable Track Changes in Microsoft Word
- How to Add Revisions in Microsoft Word
- How to Show or Hide Tracked Changes in Word
- How to Accept or Reject Changes in Word
- How to Invite Others to View or Edit
- How to Enable Track Changes in Google Docs with Suggesting Mode
- How to Add Suggestions in Google Docs
- How to Accept or Reject Changes in Google Docs
- How to Invite Others to View or Edit
- Copy-Pasting With Track Changes
- Printing With Track Changes
How to Enable Track Changes in Microsoft Word
To start using Track Changes in Microsoft Word, you’ll need to enable it first, regardless of the platform you’re using to work on your document.
PC
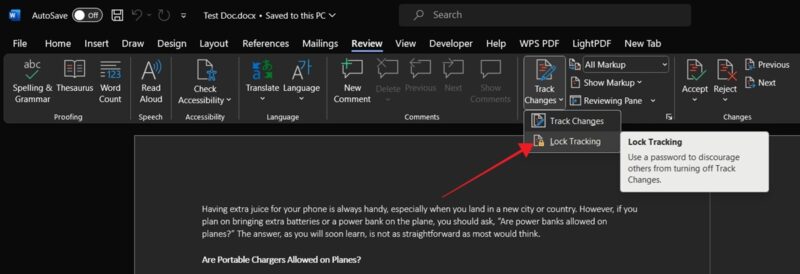
Open a document, and click on Review in the ribbon menu at the top. Select Track Changes, or press Ctrl + Shift + E to turn Track Changes on or off.
If you’re sharing your PC with other people and worried they may turn Track Changes off in your document, click on Lock Tracking. Enter a password, then press OK.
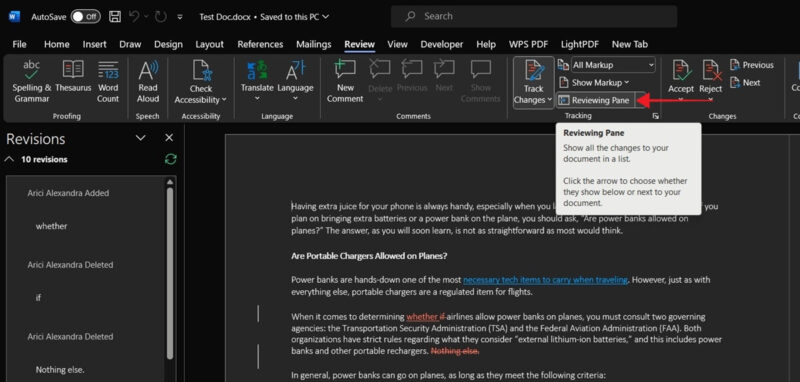
Next, click on the Review Pane to view the changes that you’re making as you’re editing the document in real time.
Web
If you’re using Word for the Web, click on Review in the ribbon menu, then click on the drop-down menu that says Off by default. Select either Everyone or Just Mine to start adding revisions.

Mobile
While Track Changes is available in the Word app for Android, you can’t enable it without a Microsoft 365 subscription. The Word app for iOS only lets you view documents, but all editing is reserved for those with a paid account.
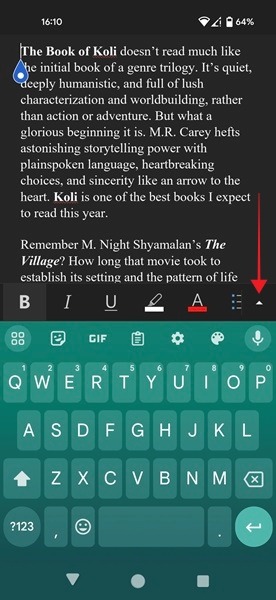
If you have one, open the document in your app, and press Edit at the bottom. (We’re using the Android app for this tutorial.) Tap on the tiny arrow on the right of the bar at the bottom.
Tap Home, then select Review from the list of options.
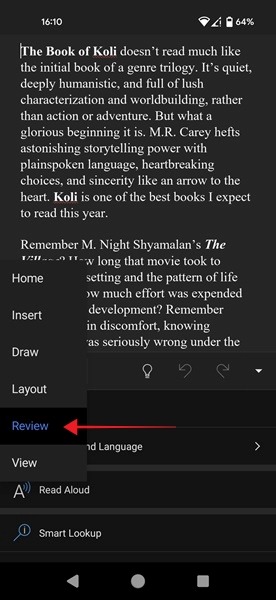
Swipe downwards until you find the Track Changes option and select it.
Tip: see how easy it is to search a Word document.
How to Add Revisions in Microsoft Word
Adding revisions to a document is very easy. Delete text or replace it as needed, just as you would normally when editing a document. The difference when using Track Changes is that any changes you make to the document will be marked.
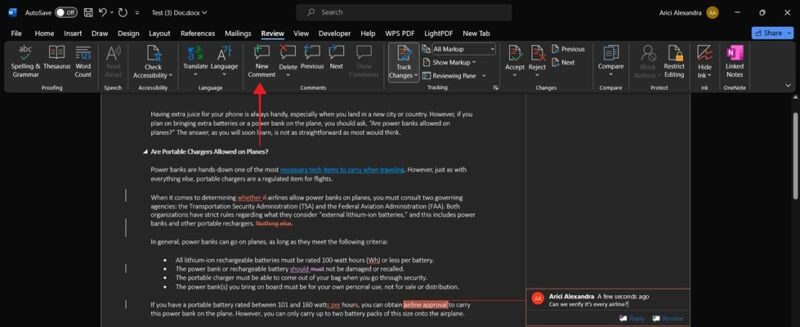
If you need to insert some detailed instructions into the document, do so via comments. Use your mouse to highlight a specific piece of text, then click Review -> New comment. Write the information in the text box on the right.
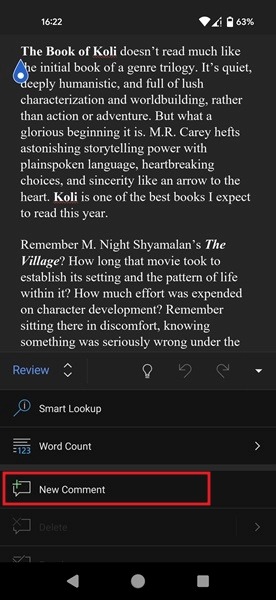
In the Android app, add comments for free. Go to the text in which you’d like to comment, then switch to Review (as explained above), and tap on New Comment.
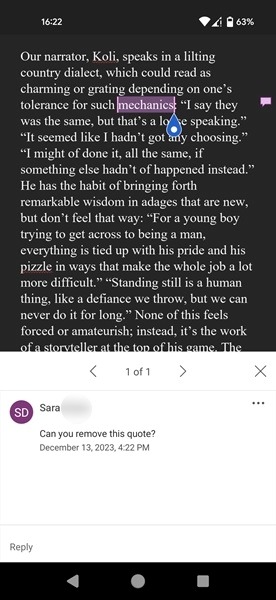
Write your comment here, and press the Send icon. The text will be immediately highlighted, and the comment will be visible on the bottom after you tap on the text.
How to Show or Hide Tracked Changes in Word
You can show and hide tracked changes made to a document in the Word app for desktop, as well as in the Web version.
PC
When you open a document that has been previously edited with Track Changes, the newer Word versions won’t show you these changes by default (except comments). Instead, you’ll notice red vertical lines in the margins adjacent to the text that changed.
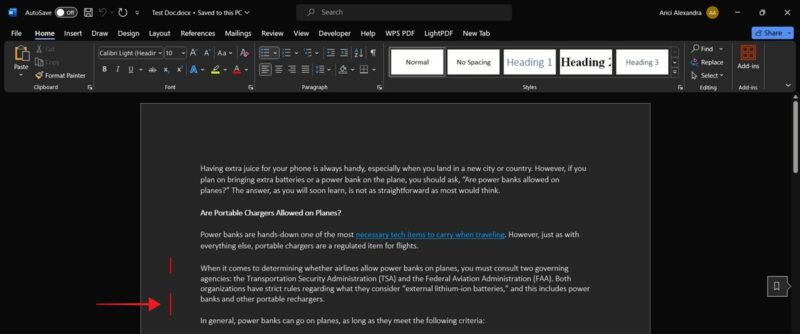
Click on these lines to make the changes visible. Your document may contain several types of alterations. Deleted text is marked with a strikethrough, while added text is underlined. If the text was formatted, information regarding the new format will be added in the margin on the right.
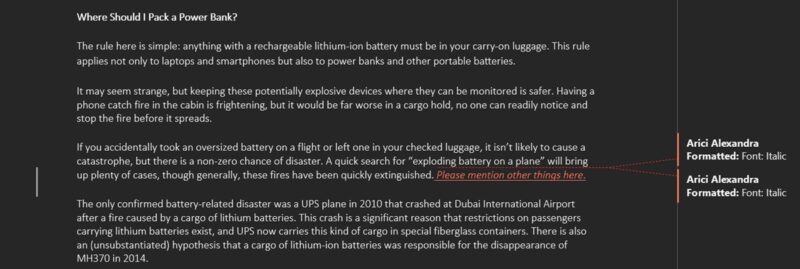
Note: if multiple people have made edits to the document, their modifications will show up in different colors.
You can alternate between the various modes of viewing changes that have been made to the document by clicking Review -> All Markup drop-down. If you wish to see the document as it was in the beginning, click on Original. Select No Markup if you want to see the text without the changes. Opting for Simple Markup will only display the vertical lines next to the text.
In addition, if you click on Review -> Show Markup, you have the option to display only specific types of revisions, such as Insertions & Deletions or Formatting. Additionally, you can opt to have all revisions show up in Balloons on the right side of the display.
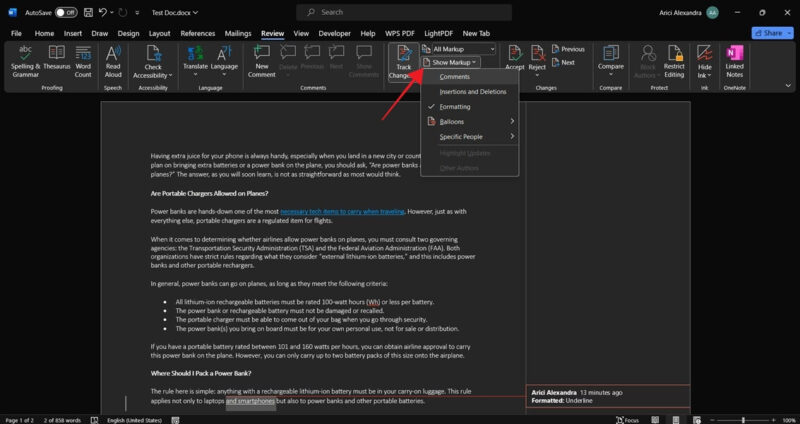
If you’re looking to view only revisions from a certain person, click Review -> Show Markup -> Show specific people.
Web
Once you upload the previously edited file into Word for Web, you’ll immediately be able to see the changes that have been made. You’ll also be notified that Track Changes is on.
Switch to the subtle version by clicking on Review -> Markup View -> Simple Markup.

Mobile
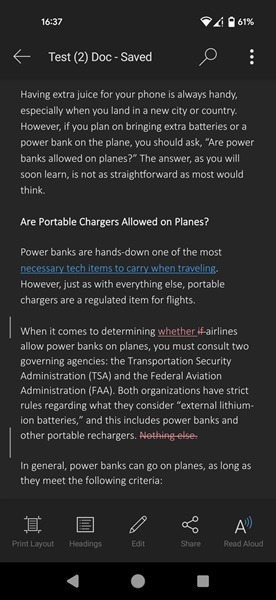
You can see revisions if you open a document that was previously edited with Track Changes. You can also continue editing in this way.
FYI: learn how to create a custom style in Word and draw attention to your work.
How to Accept or Reject Changes in Word
To accept a change in a document that has been edited with Track Changes, find a revision, and right-click it. Select either Accept [change] or Reject [change], depending on what you need to do.
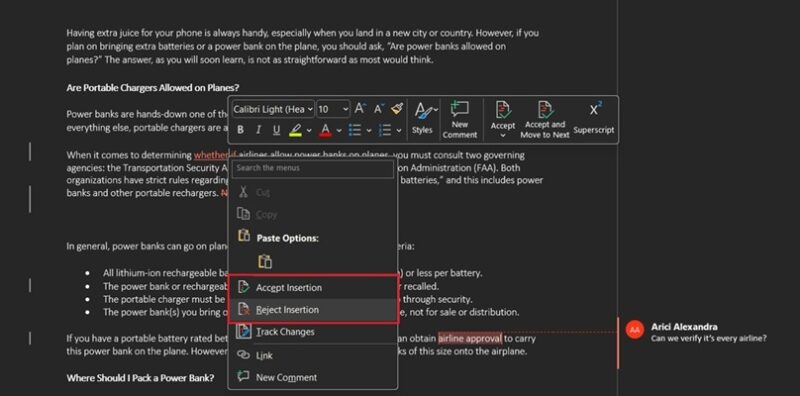
Alternatively, check the toolbar above (if you’re using the desktop app). You’ll have a few more options available, which are worth exploring. Accept and move to next or Accept all changes. Alternatively, there’s also the option to Accept all changes and stop tracking if you’re done editing this document.
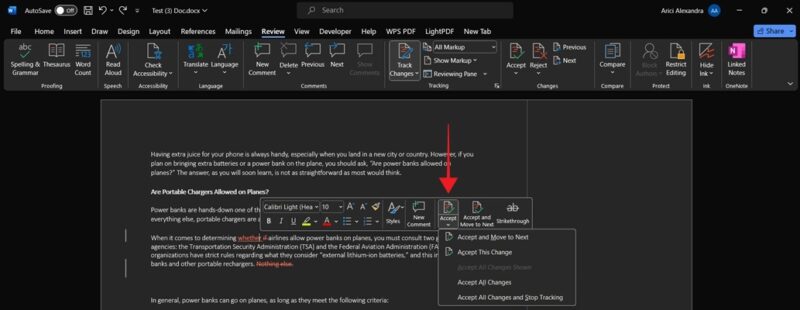
On mobile, unfortunately, you won’t be able to accept or reject changes unless you have a Microsoft 365 subscription. If you do, just tap on the revision, and select the appropriate icon from the menu.
How to Invite Others to View or Edit
Click on the Share button in the top-right corner of your screen, then click Share again.
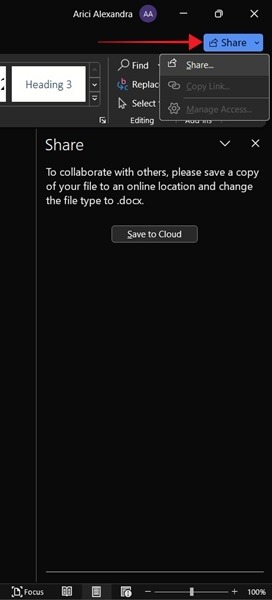
You’ll need to upload the document in the cloud via OneDrive before you can share it with others.
Once you do that, click on the Invite people field to enter a name or email address. By default, anyone with the link can edit. You can change this and only allow others to view the documents.
Include a message if you want, and decide whether you want to always automatically save changes, then press Share.
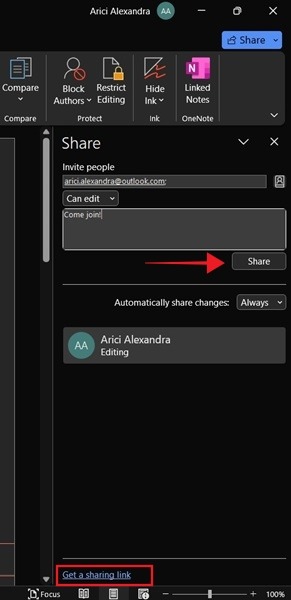
Alternatively, click Get a sharing link at the bottom to easily share through your favorite messaging apps. On mobile, the Share button is at the bottom.
Tip: add a table of contents in Google Docs by following these instructions.
How to Enable Track Changes in Google Docs with Suggesting Mode
In Google Docs, Track Changes is known as Suggesting Mode and is also available in the Web app and on mobile.
PC
Open the document, and click on Editing in the right corner of the toolbar, then select Suggesting.
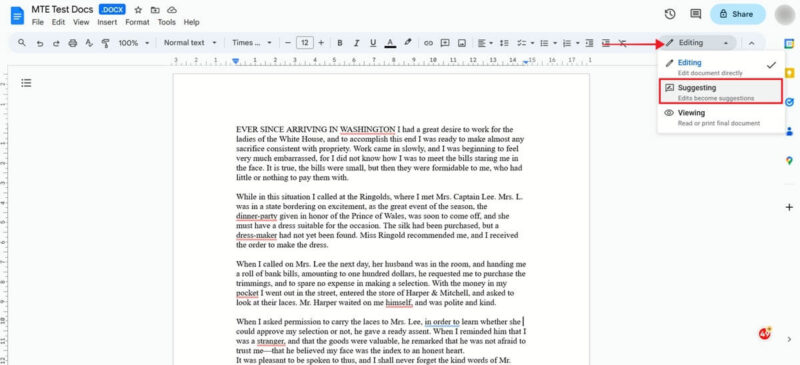
Alternatively, enable Suggesting mode by moving your mouse toward the right margin, and clicking on the Suggest edits icon.

Mobile
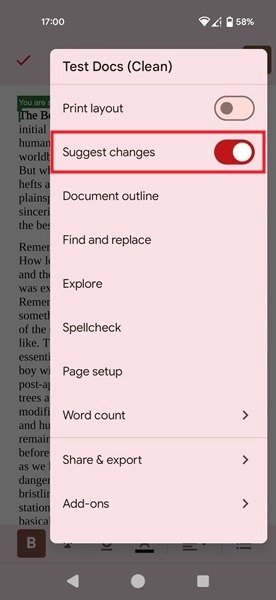
Open the document, and press the three dots in the upper-right corner. Enable the toggle next to Suggest changes.
How to Add Suggestions in Google Docs
Once Suggestion mode is enabled, edit the article as you normally would.
PC
These revisions will be marked. Text you delete will show up with a strikethrough, while text that you add will appear underlined. Additional information is shown in bubbles for every revision on the side.
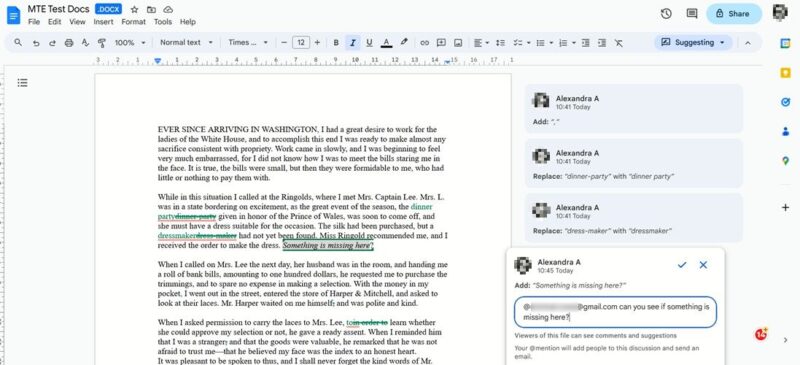
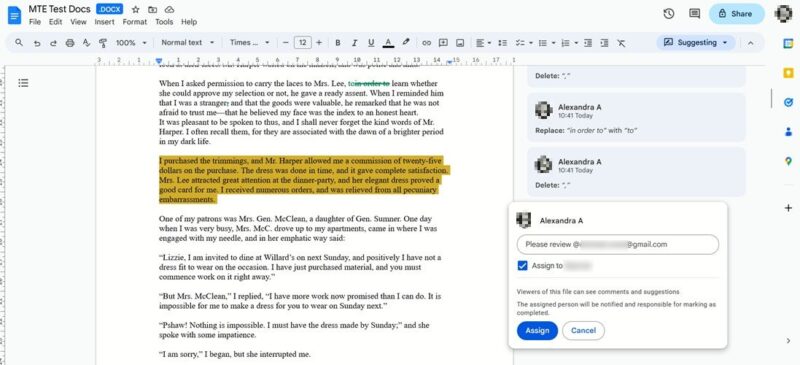
You can also leave specific comments on the text by selecting the text in question and clicking on the + icon on the side of the document as you hover your mouse over the text.

Add your comment in the box. You can tag other members of your team by using their email address. Whoever you @mention will receive an email inviting them to view the document.
Mobile
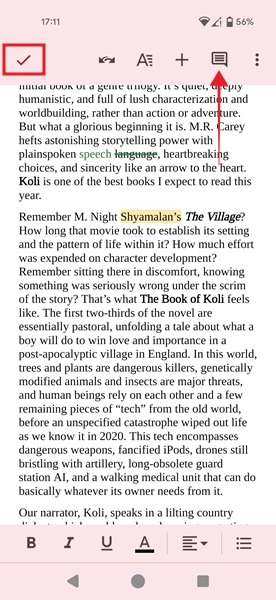
To start editing the document on your mobile device, tap on the edit icon in the lower-right corner. Then delete, add text, and make whatever changes you need to, as usual.
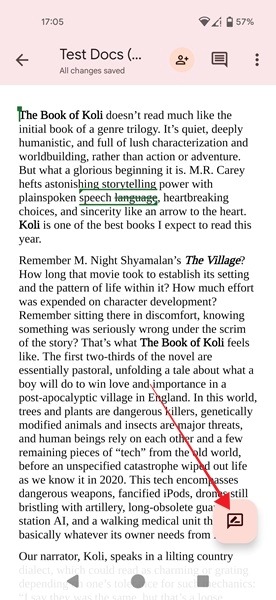
If you need to add a comment, tap on the + button and select Comment. To view the bubbles for each revision, tap on the message-like icon at the top. Press the ✓ icon when you’re done editing.
Good to know: follow this guide to learn how to search for a word in Google Docs.
How to Accept or Reject Changes in Google Docs
When you open a document that has been edited and now features several suggestions, you will see each suggestion and its relevant bubble on the right (if you’re on a desktop). On mobile, these are hidden.
PC
Click on a specific bubble to expand it. To accept a change, select the ✓ sign, and to reject one, press on the X. If you don’t agree with the suggestion made, you can also leave a comment in the reply text box below.
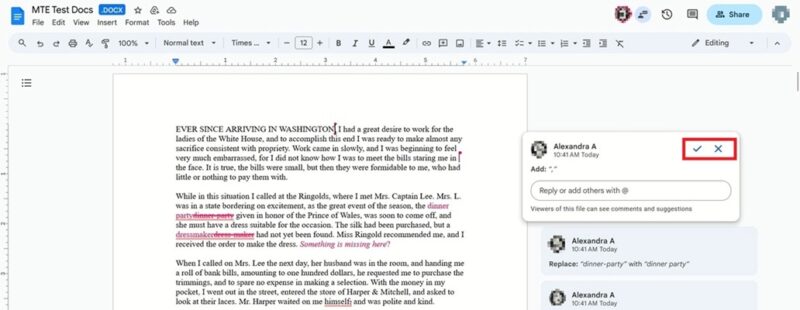
Once a suggested edit is implemented, the associated comment panel will disappear.
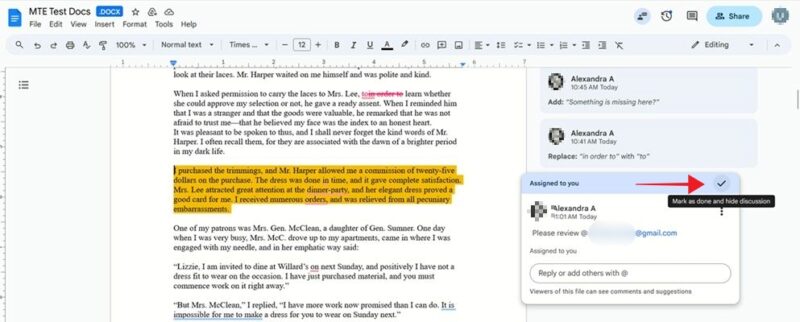
For comments, click the ✓ button once you’ve edited according to the instructions to remove them from view.
Mobile
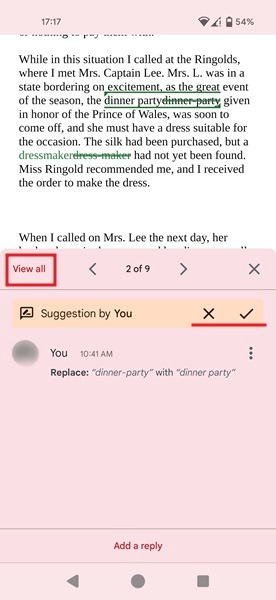
Tap on a revision and decide to either accept or reject it. You can also add a reply. At the top, press View all to see all changes, or shuffle between them by tapping on the arrows.
How to Invite Others to View or Edit
If you wish to invite more people to help you edit this document, click on the Share button in the upper-right corner.
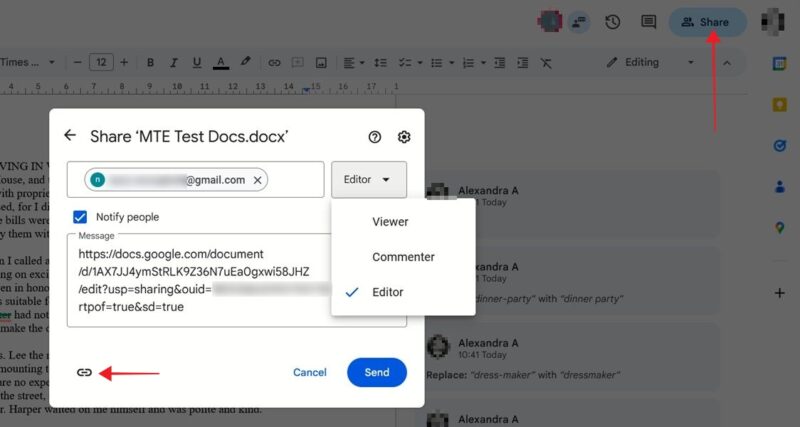
Add people or groups via the bar at the top. On the next screen, click the link icon below, and add it to the message field. Decide whether the person you’re inviting can be an Editor or just a Commenter or Viewer, and click Send.
On mobile, tap the three dots in the upper-right corner, then select Share & export.
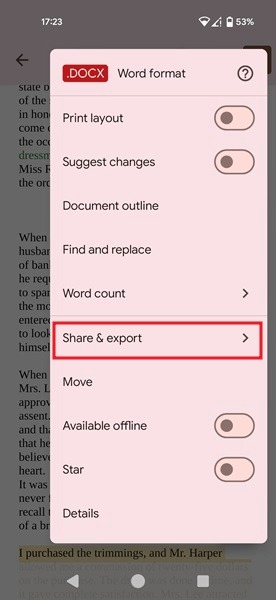
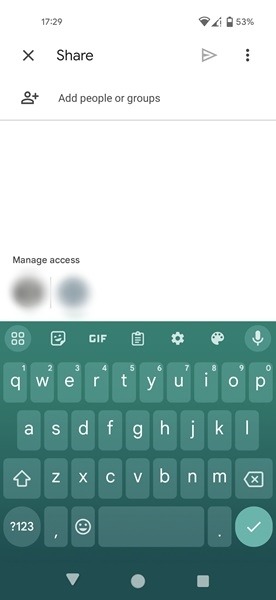
Select Share to invite others to take a look at the document. Tap on Manage access to tweak the doc’s privacy settings, and generate a direct link.
Copy-Pasting With Track Changes
If you’re wondering whether copy-pasting will retain the changes made to a document, the answer is “Yes” for Word and “No” for Google Docs.
If you’re copy-pasting into the same Word document with Track Changes still on, the text will change color and be counted as a revision. Copy-pasting outside the original document will get you a copy of the edited text.
That’s not the case for Google Docs, where your changes will be copy-pasted regardless of whether the destination document is a new one or the same document that’s been edited.
Printing With Track Changes
If you’ve finished editing, it would be better to turn off Track Changes so that the document can be processed for publication, posting, or printing.
You can print your Word document even if the feature is still enabled, and you haven’t resolved all the revisions yet. Make sure you switch to No Markup first so that all the changes will be applied and the marking removed from the page. If you wish to print the original document before revisions, click Original.
In Google Docs, your printout won’t retain the existing formatting, nor will it show the suggestions. You’ll just get a copy of the original document. If the changes have been ratified and marked as done, your Google Docs printouts will come out clean and reflecting your modifications.
Tip: you can print directly from your iOS device.
Editing in the Fast Lane
If you frequently work with both platforms, you may find it helpful to know how to convert Google Docs to Microsoft Word documents (and vice versa). Also make sure to check out these free project management templates for Microsoft and Google.
Image credit: DepositPhotos. All screenshots by Alexandra Arici.
Our latest tutorials delivered straight to your inbox