“Your response to the CAPTCHA appears to be invalid” is a common error on Steam in Windows. It appears when your input into the CAPTCHA challenge is deemed incorrect or suspicious. Several factors can cause this issue, like corrupted cache, poor Internet connection, and browser issues. This guide covers various solutions to help you resolve Steam CAPTCHA not working.
Good to know: dealing with Steam error code E8 instead? Check out our post to see how to bypass it.
Basic Troubleshooting
The following are a few preliminary fixes to try before diving into the more specific ones.
- Restart your browser – close and reopen your browser to see whether that fixes the Steam CAPTCHA error.
- Refresh the Steam signup webpage – CAPTCHAs may not work if they are not loaded fully. Try refreshing the Steam signup page to ensure CAPTCHAs load properly.
- Restart your Internet router – restarting or completely rebooting your home network can clear temporary glitches affecting Steam CAPTCHA.
- Switch to a different internet connection – if the CAPTCHA isn’t loading, try a different Internet connection to see if it fully shows up afterward.
- Disable your VPN – VPNs can sometimes interfere with CAPTCHA, so turn yours off to see if it resolves the issue.
- Ensure the issue isn’t browser-specific – try accessing Steam on a different browser. If CAPTCHA works on one but not the other, the issue may be browser-specific.
Are you still facing the CAPTCHA error on Steam after trying these quick fixes? Continue with the more advanced solutions discussed below.
Tip: check out the best Chrome themes that can beautify your browser.
1. Change Internet Protocol Version
IPv6 is the next-generation Internet Protocol (IP) address standard that aims to supplement and eventually replace IPv4. Even so, there are still many internet connections that don’t fully support IPv6 yet. While we tend to have both options enabled, if you’re dealing with the Steam CAPTCHA issue, it may be a good idea to disable IPv6 and only leave IPv4 enabled.
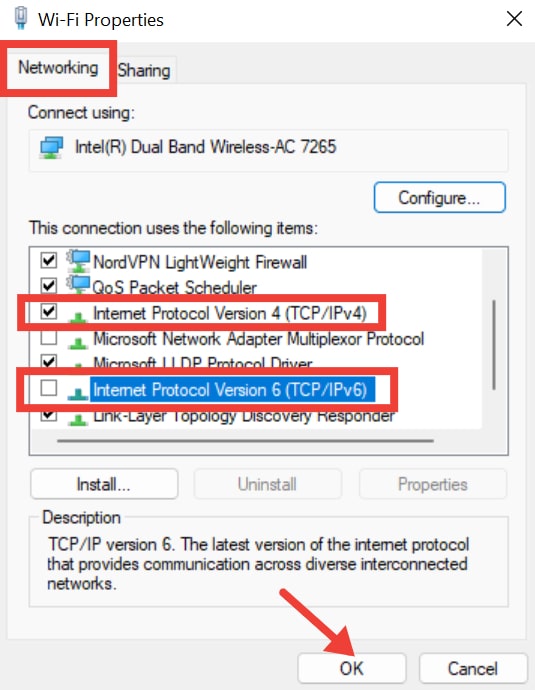
To change your Internet protocol version, type View network connections in the Windows Search bar. Right-click your Internet connection and select Properties. In the Networking tab, uncheck the IPv6 box, but make sure the IPv4 box is checked. Click OK to save the changes.
Hopefully, this will resolve the Steam CAPTCHA issue, but if it doesn’t, move on to the next method.
2. Change Steam Page Language
If you’re traveling, CAPTCHA elements or scripts on the page may not load or function correctly in your default language. This can cause Steam CAPTCHA to appear broken or fail to load. By switching to the language of the country you are actually in, you should be able to effectively load the CAPTCHA.
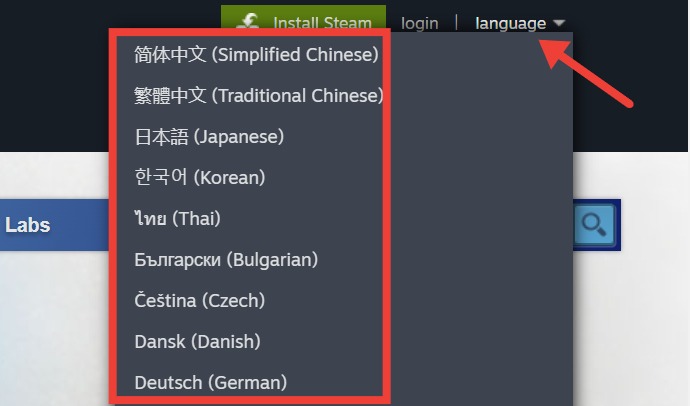
To do that, open Steam on your browser, and click the language button in the top-right corner. Choose the language of the country in which you are residing. The app will restart to apply the language change.
3. Disable Proxy Server
If you’re using a proxy server on your PC, it can cause conflicts with the way Steam communicates with its servers, causing problems with CAPTCHA. Try turning off the proxy server to see whether it solves the problem.
To disable the proxy server, press Win + I to open Settings. Navigate to Network & Internet -> Proxy. Under Automatic proxy setup, disable Automatically detect settings.

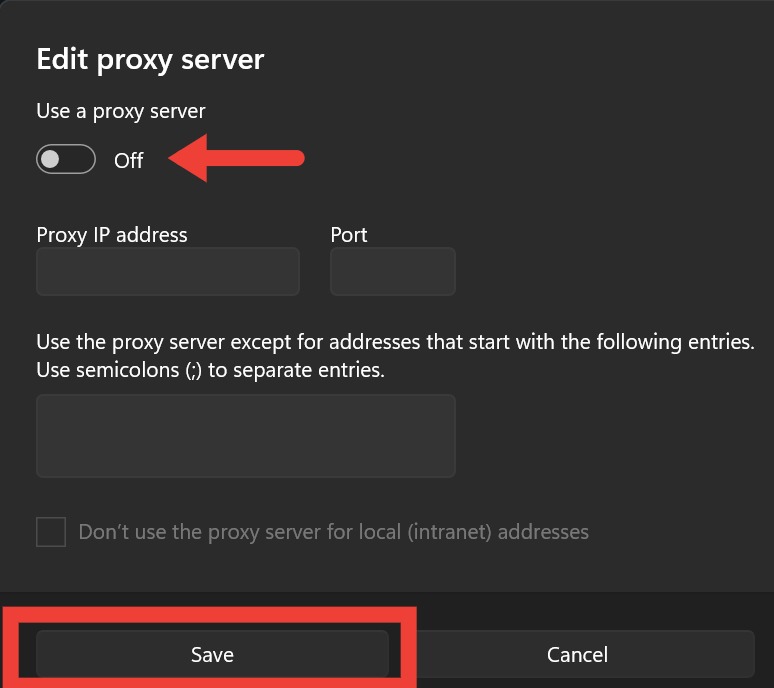
Scroll down to the Manual proxy setup section, and click the Set up button next to Use a proxy server. Toggle the Use a proxy server option off, and click Save.
Tip: need a dynamic DNS provider? Check out our list for the best free options.
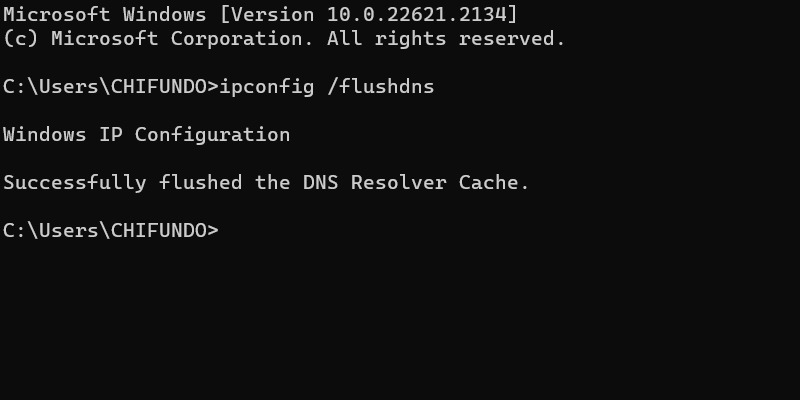
4. Flush the DNS Cache
A corrupted DNS cache can occur due to changes in website DNS records or malware attacks, leading to problems with Steam CAPTCHA verification. By flushing the DNS cache, you can clear out outdated and corrupted data, including problematic cached IP addresses and DNS records, which may be causing CAPTCHA verification failures. Check out our guide to see how to flush the DNS cache.
5. Reset Windows Socket API
Windows Socket API, also known as Winsock, serves as a bridge that facilitates communication between network services and Windows network software. Though it ensures smooth Internet connections, it can malfunction over time.
When that happens, Winsock can disrupt network communication, leading to CAPTCHA problems. By resetting it, you can restore the proper functioning of network services, ensuring a reliable connection.
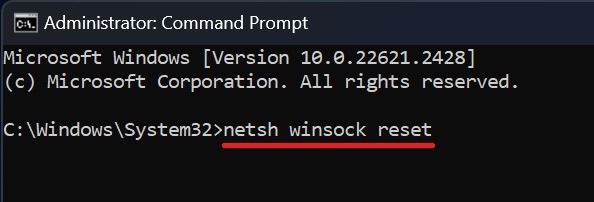
To reset Winsock, type “Command Prompt” in the Windows Search box, and click Run as administrator on the right. Type netsh winsock reset, and hit Enter.
Tip: read this guide to understand what browser cookies are and how they affect your privacy.
6. Clear Site Data and Cookies
Over time, site data and cookie accumulation can lead to Steam CAPTCHA not working. By clearing this data, you can ensure that the Steam CAPTCHA loads properly, making it easier to use Steam on Windows.
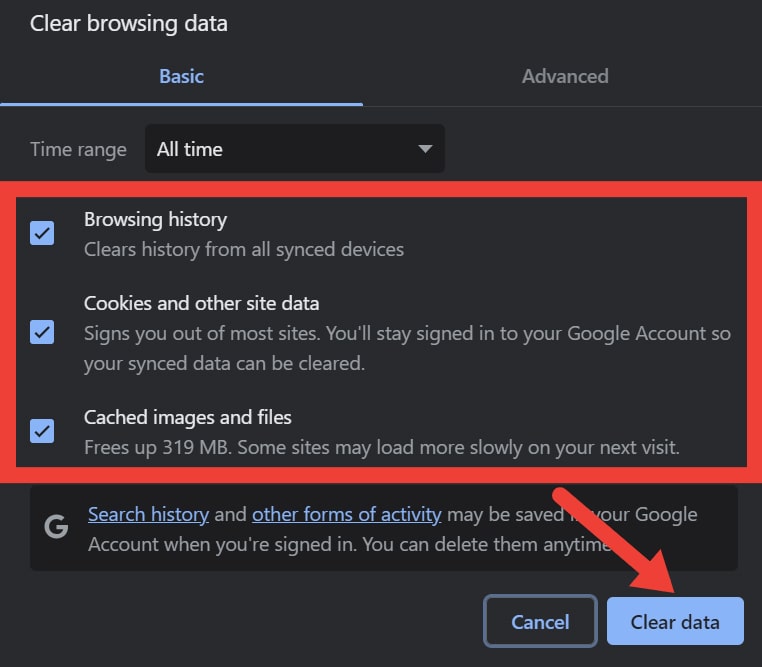
To clear site data and cookies in Chrome, click the three dots in the top-right corner, and select Settings. Go to Privacy and Security -> Clear browsing data.

In the Basic tab, set the Time range to All time, check all the boxes, and select Clear data.
FYI: did you know that you can customize your Steam ID? Check out our post to learn more.
Get Rid of Steam CAPTCHA Errors
CAPTCHA-related issues can block access to your Steam account, so you need to move fast to fix them. Alternatively, if you’re seeing the Steam login error code E87, check out our guide to learn how to eliminate the problem.
Image credit: Unsplash. All screenshots by Khizer Kaleem.
Our latest tutorials delivered straight to your inbox