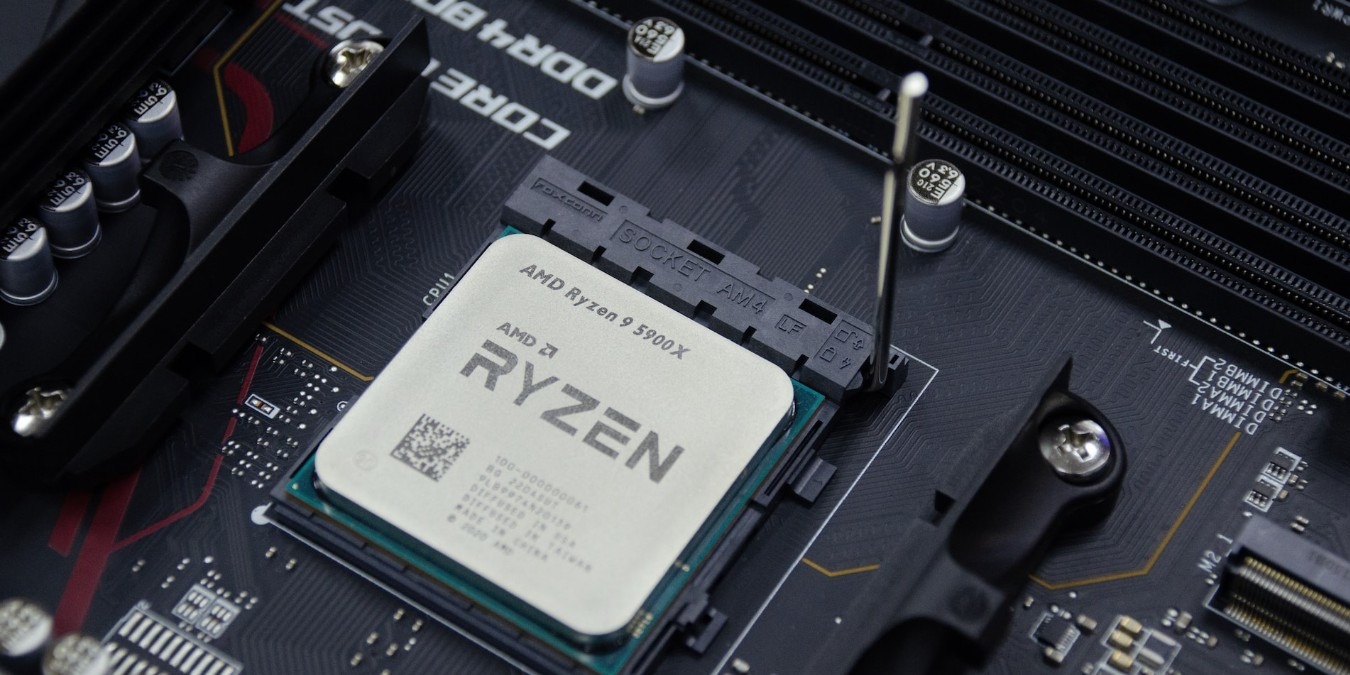
Overclocking your AMD Ryzen CPU allows you to squeeze the last ounce of performance out of your chip to increase system performance. Undervolting lowers the CPU’s voltage to make it run cooler, while not sacrificing a lot on performance. Pushing your CPU to run beyond its stock settings needs some careful tweaking. This tutorial shows how to overclock and undervolt your AMD Ryzen CPU.
Tip: find out whether AMD Ryzen CPUs are good for gaming.
Things to Know Before Overclocking AMD CPU
1. Ensure Sufficient Cooling
Overclocking a CPU will increase the power draw and the heat produced by the processor. Hence, it’s best to ensure there is sufficient cooling before you start the overclocking process. You should check out an aftermarket CPU air cooler or AIO cooler. You should also overclock only on a motherboard known for handling overclocking and a power supply with sufficient wattage and build quality.
Good to know: if you are looking to buy a new CPU, you should learn about the importance of its core count and clock speed.
Be Careful Not to Overdo It
Any operation of the CPU beyond its specifications will also void its warranty, so you won’t want to overdo it. If you overclock an AMD CPU with Ryzen Master, a customary warning is displayed. If you are careful to not push the chip beyond the specified operating threshold, you needn’t worry.
Benchmark Your System
It’s best to run a benchmark of your current stock performance so that you have something to compare to later. You can use Cinebench to get single-core and multi-core scores of your CPU’s default performance.
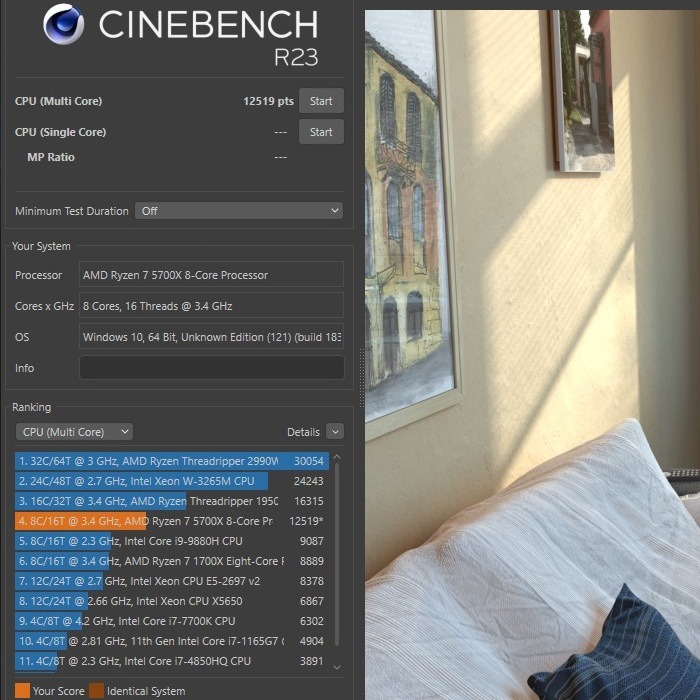
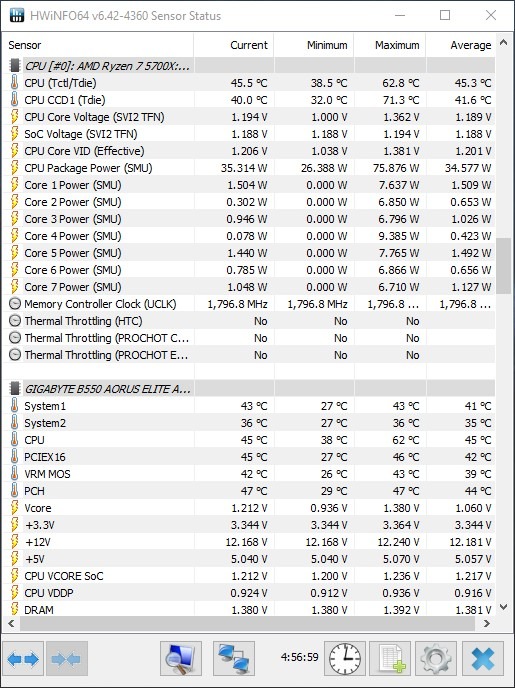
Also, we recommended using HWiNFO to monitor the CPU temperature, voltage, and power readings during the benchmark. You can repeat the Cinebench tests after overclocking your processor, and compare those scores with the stock scores to see how effective your overclock was. Successful Cinebench runs also help determine whether your overclock is stable.
Don’t Take Shortcuts
Lastly, you should never try to use overclock settings found on the Internet on your own chip – even if it’s the same model. Due to the so-called Silicon lottery, no two units will have the same overclocking headroom. Make sure to test your own settings on your CPU before running a sustained overclock.
Overclocking Ryzen CPU Using Ryzen Master
The easiest way to overclock your AMD CPU is Ryzen Master — AMD’s overclocking and system monitoring software that provides overclocking features in a Windows environment. Before you start fiddling with its knobs and dials, there are a few things you should know:
- Your overclock settings will be reverted to default with every system reboot. Ryzen Master doesn’t support auto-start on boot yet.
- The list of supported processors is limited to Ryzen 2000 CPUs and newer, with feature support differing between CPU generations.
- Ryzen Master is useful for users who don’t want to run a 24/7 overclock. Turn overclocking on or off with a click, depending on the workload you’re running – no BIOS tweaking is needed.
Download Ryzen Master from AMD’s website, and install it using the instructions of the setup wizard. There are three overclocking modes in Ryzen Master to boost your CPU’s performance:
- Precision Boost Overdrive (PBO)
- Auto Overclocking
- Manual
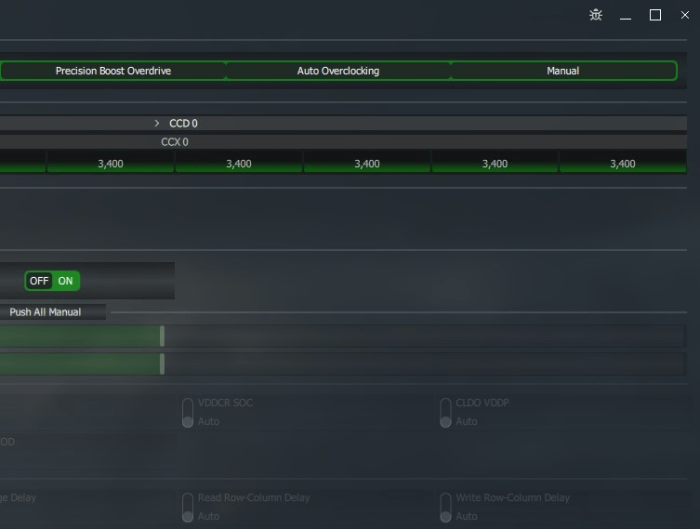
While PBO and Auto OC are mostly one-click modes that utilize automated boost mechanisms set by your CPU and motherboard design, the manual mode gives you the most flexibility for overclocking your AMD CPU. Users looking for higher gaming performance can choose Auto OC, while those wanting a boost to multi-threaded workloads can opt for PBO.
Overclocking With PBO for a No-Nonsense Boost
PBO is not meant to push your CPU’s frequency beyond the advertised base or boost clocks. It manipulates three separate power limits – PPT, TDC, and EDC – to allow the CPU to reach those advertised boost clocks more often and for sustained intervals, hence improving performance.
You’ll notice a few profiles on the left side of the window. The Creator Mode and Game Mode are preconfigured profiles. While the former can help with multi-threaded scenarios, the latter should only be used for legacy game support on CPUs with more than eight cores, per AMD’s documentation. For our purposes, we are using Profile 1 and Profile 2.
To enable PBO in Ryzen Master, head to Profile 1, and click Precision Boost Overdrive in the Control Mode options on the right pane.
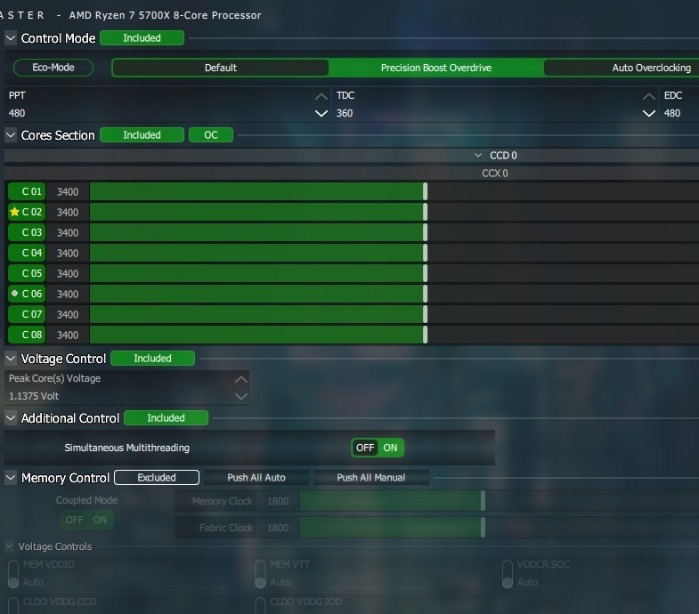
We are leaving the Additional Control and Memory Control settings as is for this mode. Click Apply at the bottom of the window. No system restart is required.
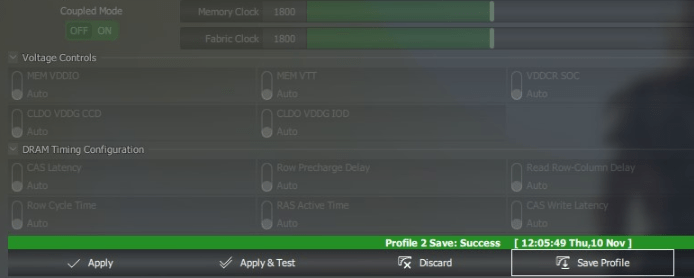
Save the settings by clicking Save Profile at the bottom of the screen.
Run Cinebench to get a new score for the multi-core test, and check what effect PBO had on the performance. You can also choose to run a single-core test again, but PBO hardly affects single-core performance.
Overclocking With Auto Overclocking for an Aggressive Boost
The Auto Overclocking mode is used to set a boost frequency higher than the advertised boost clock. While Auto OC keeps Voltage Control locked just like PBO does, it allows the CPU to boost to higher frequencies while staying under automatic control.
This mode is recommended for users who want to overclock their AMD CPU to explore a boost in single-threaded workloads, like gaming and encoding, but don’t want the hassle of manipulating voltage as well.
To set an automatic overclock, click on Profile 1 or Profile 2, and set Control Mode to Auto Overclocking in the right pane.
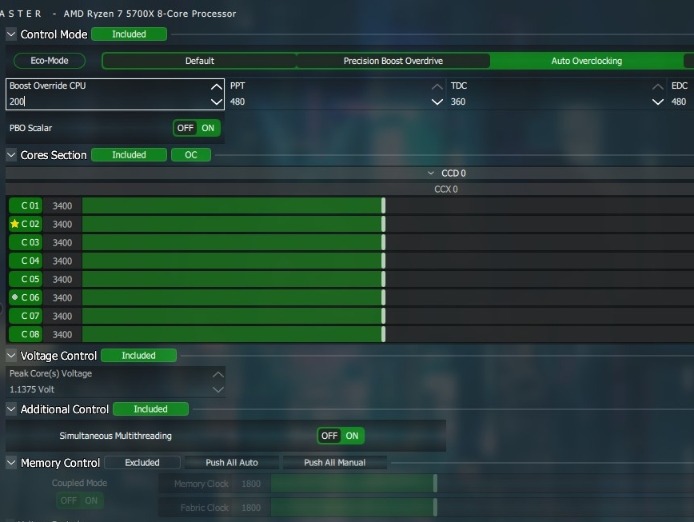
Just below that, you’ll find the Boost Override CPU setting. Use this to increase the clock speed, and let Ryzen Master manage the voltage accordingly. The recommended method is to increase the clock speed by only 25 or 50, and then test the stability of the benchmark. Do this with the Apply & Test button at the bottom of the window or with Cinebench.
You also have control over the PPT, TDC, and EDC limits but can leave them on the default settings for now.
If the stress test hangs or crashes the system, relaunch Ryzen Master, and test a lower frequency in the next run.
Note that Ryzen Master will require a system restart on engaging the Auto Overclocking mode. We’ll leave the other settings like Memory Control untouched.
Overclocking With Manual Mode for Maximum Control
Finally, the Manual mode unlocks all the settings you need to overclock your AMD CPU, allowing you to not only set the per-core frequency, but also tweak the voltage supplied to the CPU. The principle here is to increase the voltage by as little as possible to keep the higher CPU clock stable.
If your Cinebench test is crashing the system after increasing the clock speed, increasing the voltage in small increments can increase system stability. If you noticed, however, that the CPU temperature in HWiNFO was too high (close to 90 degrees) just before the crash, voltage might not be the issue. Instead, you may need to decrease the frequency a bit.
The Manual mode can potentially unlock higher clock speeds than the Auto Overclocking mode, as you’re no longer limited to the conservative power and temperature curves of the automatic modes.
To start applying your desired changes, click on Profile 1 or Profile 2, and select Manual under Control Mode.
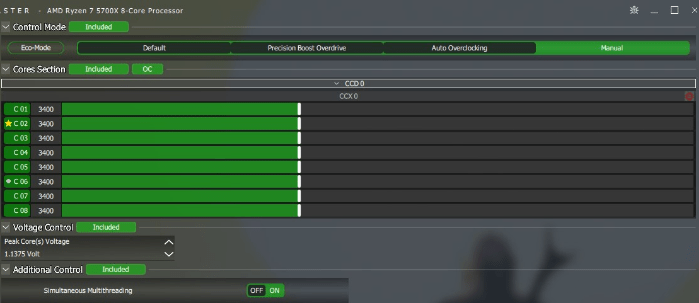
Expand the CCD 0 and the CCX 0 rows under Cores Section. You’ll see the fastest and second fastest cores on your CPU denoted with a yellow star and a grey circle, respectively. (We’re using the Ryzen 7 5700x for illustration. Your core layout could differ, depending on your CPU.)
If you want to focus only on the fastest cores, increase the frequency by dragging the respective sliders or typing in the desired frequency (again, in small increments).
You can also set an all-core overclock by clicking the red symbol in the CCX 0 row. It will turn green, and you can drag any of the individual sliders to automatically apply the increased frequency to each of the cores. Click Apply and test each of the above scenarios later with a Cinbench run to see which one scores higher.
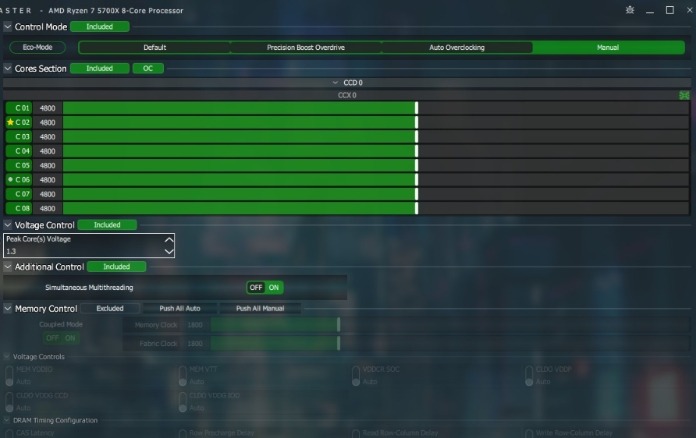
The next section to tweak is Voltage Control. Increase voltage only by one or two increments, click Apply, then test the existing frequency overclock with Cinebench. If you’re unable to achieve stability, even with multiple voltage increases, you can try reducing the CPU frequency instead.
Ryzen Master will not restart the system on engaging the Manual mode. It may, however, do so when switching from Manual to another mode. If the stress test is successful, you can increase the frequency again, repeat the test, increase the voltage if the test fails, and come back to the frequency setting if it succeeds. We’ll leave the additional settings untouched for the Manual mode.
Undervolting and Eco-Mode With Ryzen Master
Undervolting is a handy technique to make your CPU cooler and more silent than in its stock configuration. Instead of overclocking your AMD CPU, the idea is to intelligently adjust the voltage-frequency curve of the processor to achieve the same performance at a lower voltage and temperature.
In Ryzen Master, do this by selecting Curve Optimizer in the profiles section on the left, then setting Control Mode to Default. Below that, Curve Optimizer Control will already be Included with Auto Offset turned on. You can leave the settings as is. Note that Curve Optimizer is available only for Ryzen 5000 series processors or newer.
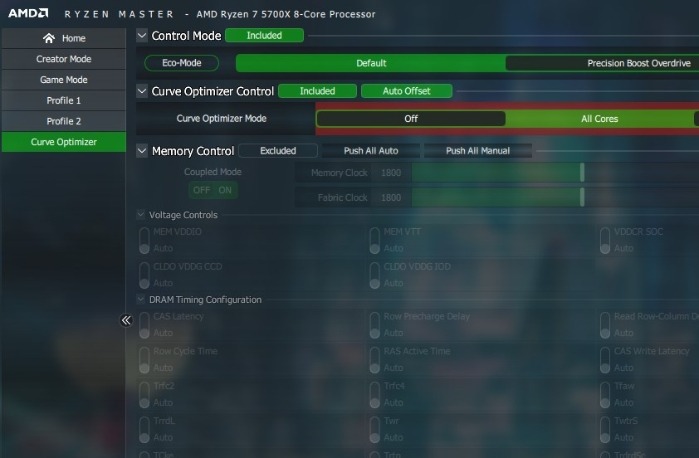
Select either All Cores or Per Core next to Curve Optimizer Mode. We are proceeding with All Cores for automatic curve optimization. Click on Start Optimizing on the right end of the row, then click OK to confirm the prompt.
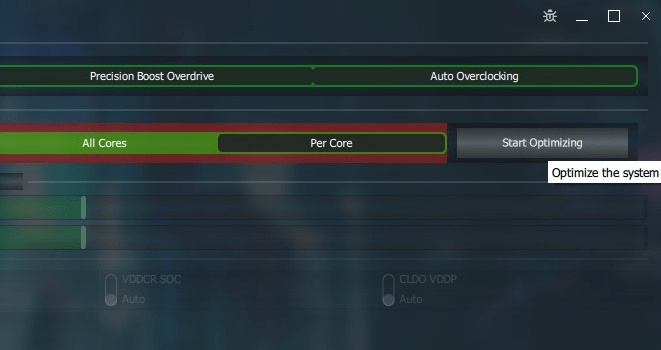
Depending on your CPU’s cores and your system configuration, the automatic optimization process will take around 30 to 60 minutes and may restart your system a few times, then display the all-core offset under the CO All Core Value section.
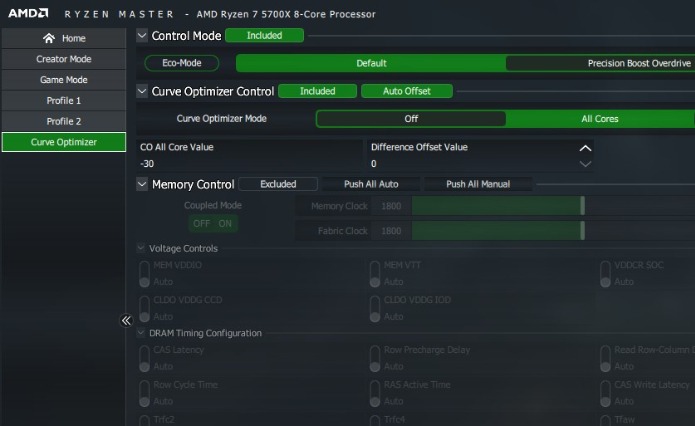
Leave the Difference Offset Value section for now, and click Apply to engage Curve Optimizer. Run a Cinebench test to compare your score and max temperatures to the default settings.
Eco-Mode With Ryzen Master
The Eco-Mode runs your CPU in a lower power condition to lower the temperature for scenarios where you don’t even need stock performance and don’t need to overclock your AMD CPU.
Open any profile on the left, enable Eco-Mode under Control Mode, and click Apply. Ryzen Master will restart the system for the changes to take effect.
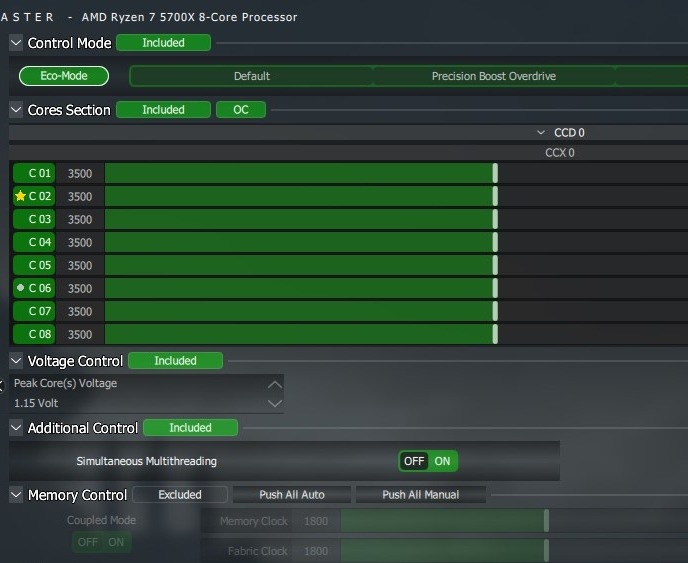
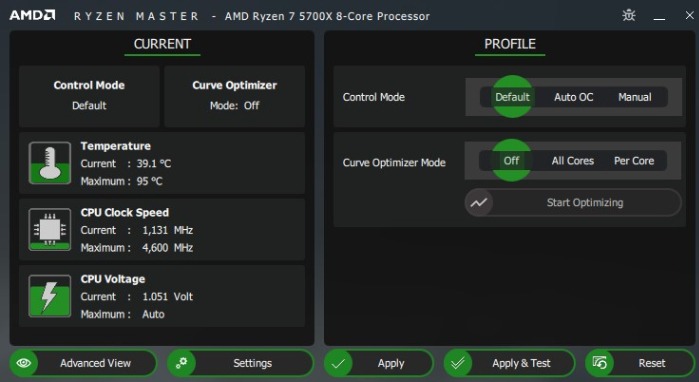
You’ll find a Reset option on the bottom left of the Ryzen Master window to revert your CPU to factory settings. Also, Basic View shows some basic CPU monitoring values, and you can do some quick overclocks with the options on the right.
Alternatively, undervolt your CPU with Throttlestop.
Overclocking Using the BIOS
If you want to save your overclock settings so that it persists after a reboot, consider using the BIOS for overclocking your AMD CPU. Some users even combine the two approaches: using Ryzen Master to test and validate settings within the tool, then applying the settings in the BIOS. Note that you’ll still need to stress test your system with Cinebench after tweaking settings in the BIOS.
Reboot your system, and boot into the BIOS by pressing Delete, F12, or any other key displayed on the first screen after restarting. We’re using a Gigabyte motherboard for illustration, so further instructions may differ a bit depending on your specific motherboard manufacturer.
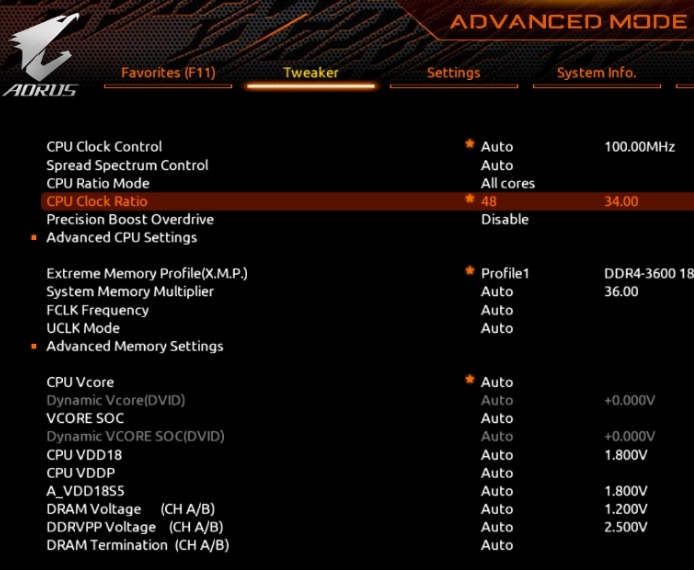
Once you enter the BIOS, click Advanced Mode, if it isn’t already enabled. Under the Tweaker tab, start by turning Precision Boost Overdrive to Disable so that it doesn’t interfere with your manual overclock.
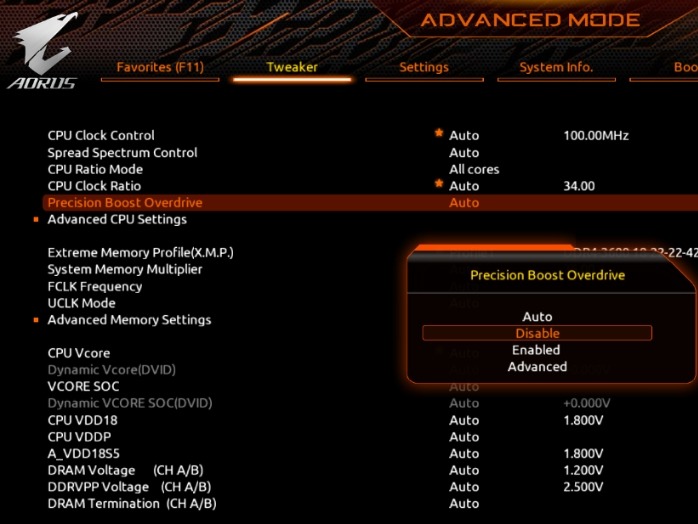
Set the frequency in CPU Clock Ratio to around 200MHz higher than your CPU’s advertised boost clock. This setting is multiplied by 100 to denote the final CPU clock. For instance, 48 would denote 4800Mhz or 4.8GHz.
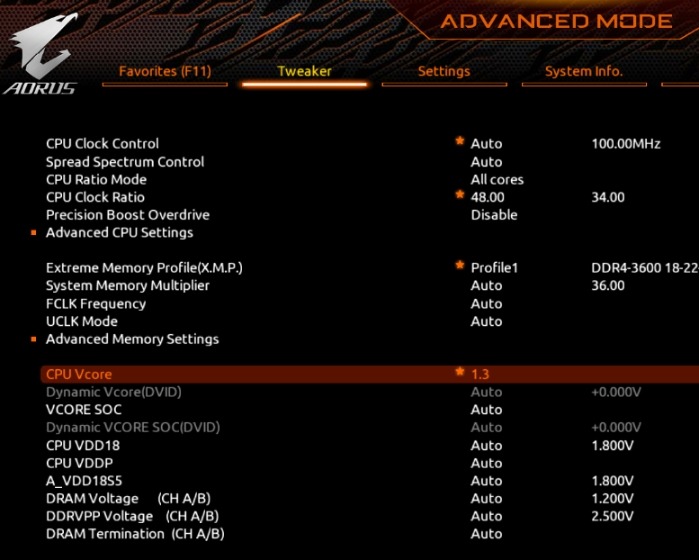
Change the voltage in CPU Vcore to maintain the higher frequency. Start with 1.30 for the first test run.
Press F10 to save all of your settings and boot into Windows. Start stress testing with a Cinebench multi-core test, and keep an eye on your temperature in HWiNFO. If the test succeeds at least three times, you have a fairly stable overclock.
If it fails, try to spot the maximum temperature before the crash. If it was close to 90 degrees, you may be thermally limited and will need to bring the frequency down by 50 to 75MHz in the BIOS before testing again.
If your system crashes, but the temperature is nowhere near 90 degrees, try upping the voltage by one step (0.00625V or 0.0135V) and stress test again. You’ll need a fair number of tests to arrive at a stable overclock for your specific CPU chip. Also, try testing a few games for two to three hours to further test the overclock.
Tip: if you get lost in the BIOS interface, find out what each setting means in the BIOS.
Undervolting Using the BIOS
You can also undervolt your CPU in the BIOS.
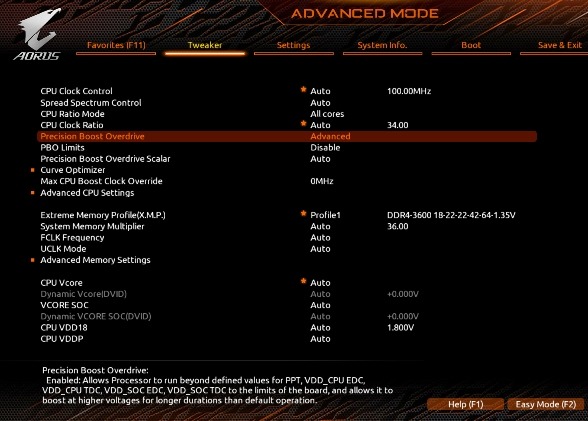
Revert all the settings to default from your previous overclock, set Precision Boost Overdrive to Advanced and PBO Limits to Disable.
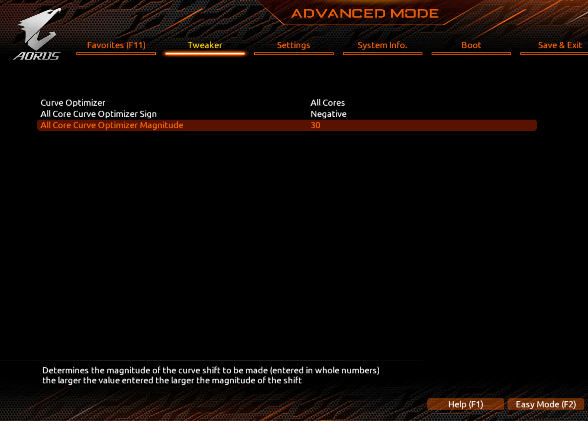
Open Curve Optimizer. Set it to All Cores and All Core Curve Optimizer Sign to Negative. In All Core Curve Optimizer Magnitude, you can set a negative offset of 10 to start and increase it to a maximum of 30.
Try testing the undervolt in Windows with stress tests, or monitoring idle temperature using HWiNFO to see if the results are worthwhile.
When you overclock your AMD CPU, just remember that a system restart will wipe all changes you made in the program, and you’ll have to reapply them or load a saved profile. You could also overclock your AMD CPU in the BIOS if you want a 24/7 overclock, but ensure you’re keeping your CPU temperature in check.
You can also overclock your GPU with MSI Afterburner to boost gaming performance. Additionally, overclock your RAM with Ryzen Master for an extra boost. Lastly, undervolt your GPU with Afterburner to save power.
Image credit: Unsplash. All screenshots by Tanveer Singh.
Our latest tutorials delivered straight to your inbox