
Microsoft Teams is a popular collaboration and communication tool for organizations. Despite it being an excellent app, you may sometimes encounter problems with the camera while attending calls. This guide provides a list of solutions to fix the Microsoft Teams camera not working on your computer.
Good to know: learn how to stop Microsoft Teams from opening automatically on startup.
Basic Fixes
Before checking out the more detailed fixes below, go through this checklist, as it may help you solve the issue of the camera not working in Teams.
- Restart Microsoft Teams – apps may encounter various problems due to temporary glitches, memory leaks, or conflicts with other processes. Restarting the app may be all it takes to eliminate the issue at hand, as you’ll be resetting it to a stable and known state.
- Restart your computer – when a PC is running for an extended period, various factors, such as software bug conflicts, can accumulate, impacting app performance. Restarting your PC will shut down all running processes and start them anew.
- Update the Teams app – make sure your app is up to date by clicking the three-dot icon in the Teams app to check for any pending updates.
- Update your camera drivers – an outdated driver could be the reason you’re seeing the error pop up in the Teams app. If you suspect that’s the case, update your camera drivers from Device Manager.
- Clear Teams cache – clearing the cache on Teams might also help. Launch Run (Win + R), type
%appdata%\Microsoft\Teamsand click OK to go to the Teams directory. Delete all files and folders from there.
1. Grant Camera Access via Settings
If you share your computer with other family members, you may have disabled camera access for some apps. You’ll have to check whether the Teams app has camera access or not.
Press Win + I to launch the Settings app. Navigate to Privacy & Security -> Camera. If you’re on Windows 10, go to Settings -> Privacy, and click Camera under App permissions.
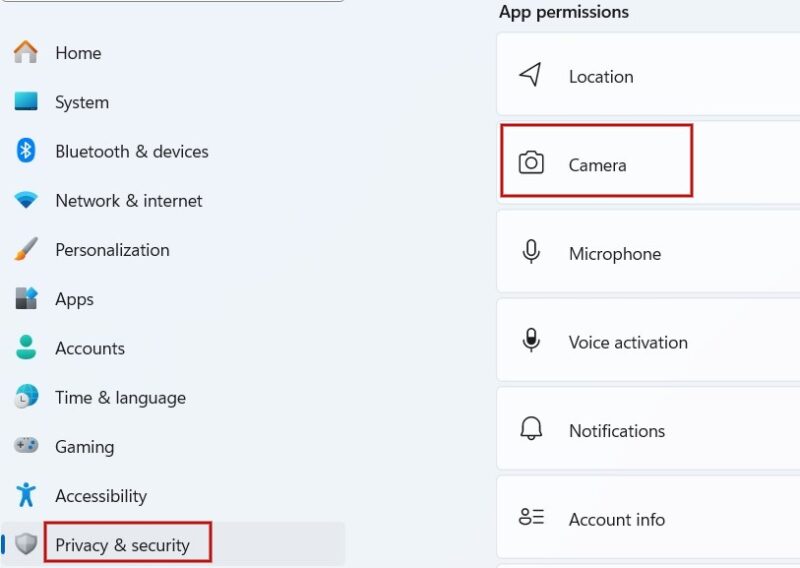
In the Camera screen, check whether the Let apps access your camera option at the top is enabled. If it isn’t, activate it, then scroll down, and turn on the toggle for Microsoft Teams.

If you are using the Web version of Teams, click the lock icon at the top left of the screen next to the address bar. In the pop-up menu, click Permissions for this site.
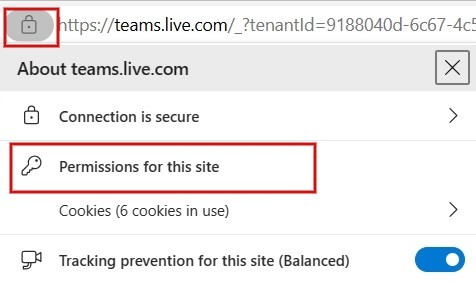
In the Settings screen, click the drop-down box next to Camera, and set it to Allow.

Tip: check out how to improve sound and microphone quality in Windows.
2. Check Whether Other Apps Are Using Your Camera
Your camera can only be used by one app at a time. It follows that if another app is using the camera, the camera not working error in Teams. To prevent that, close all apps that are making use of the camera – for instance, Skype, Meet, or FaceTime – before firing up the Teams app.
At the same time, if you’re using an external camera, try unplugging it, then plugging it back in after a few seconds to see if it resolves the issue.
3. Check Whether Your Camera Is Functional
Verify that your camera is actually functional by trying other video conferencing or messaging apps, such as Skype or Zoom. If you don’t have an additional app installed, open the built-in Windows Camera app, and see whether the camera feed activates. If it doesn’t, it’s possible that the camera may be broken and in need of being replaced.
It’s important to ensure that you have selected the right camera if you are using multiple cameras on your computer, as using the wrong one can cause problems with the camera on the Teams app.
Good to know: if you have an iPhone that you’re not using, turn the iPhone into a web camera.
4. Configure Permissions
If you’re using the Microsoft Teams desktop client, check whether the necessary permissions have been enabled in the app.
Click the three-dot icon at the top right of the Teams app, and click Settings in the pop-up menu. Then, click App permissions on the left, and check whether Media (Camera, microphone, speakers) is set to on.
On the other hand, if you’re using Microsoft Teams in your browser instead of a desktop app, you’ll need to check whether you have provided permissions for the camera.
Chrome
When you initiate or join a video call on Teams, your browser will ask you to provide permissions for accessing the camera and microphone. If you have accidentally denied access, the camera won’t work with Teams.
Note: Teams for Web is only available in Chrome and Edge browsers.
To revert the situation, open the Chrome browser, and go to chrome://settings://content. Under Permissions, select Camera -> Sites can ask to use your camera.
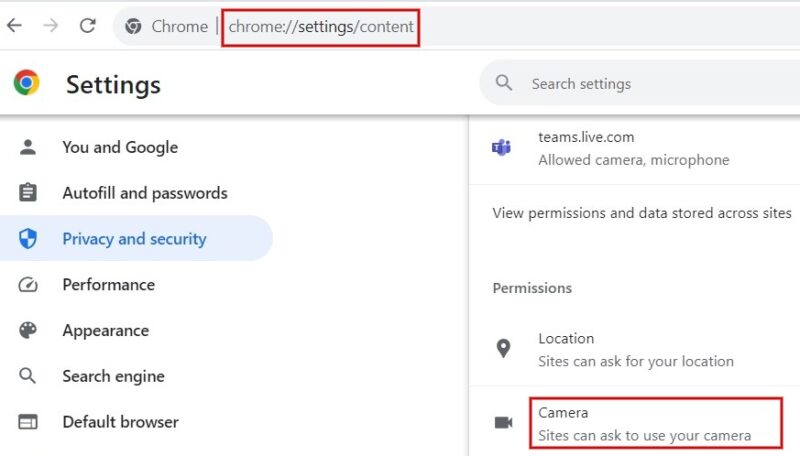
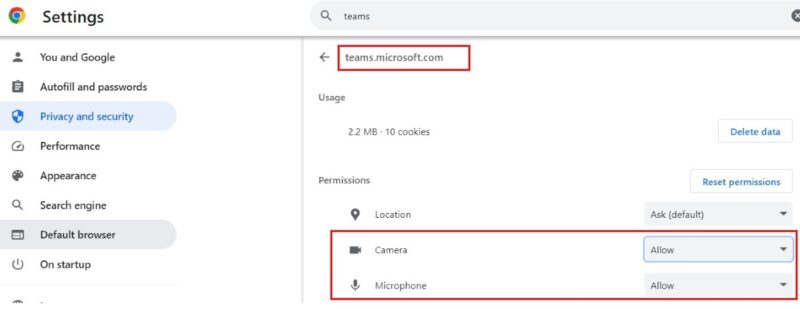
In addition, navigate to Settings -> Privacy and Security -> Site Settings -> View permissions and data stored across sites, and type “teams.microsoft.com” in the search bar at the top. Make sure the Camera and Microphone are set to Allow in the results.
FYI: check out how to view and manage saved passwords in Microsoft Edge on PC and mobile.
Edge
If you’re using Teams in the Edge browser, click the three dots icon in the top right, and select Settings. In the left tab, click Cookies and site permissions. Under the Camera section, check whether the Ask before accessing option is set to on.

This ensures that you will get a pop-up asking you to give camera (and mic) access every time you start a Teams video call.
5. Enable Camera Access in Teams App
If the Teams camera is still not working, check whether the camera is enabled in the app itself.
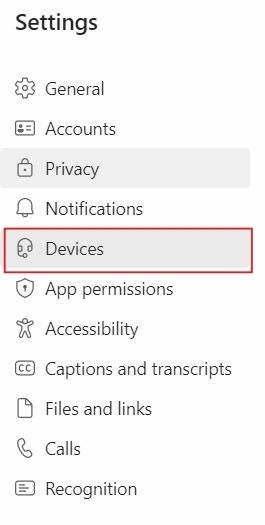
Click the three-dot icon at the top right, then click Settings in the pop-up menu. Select the Devices section on the left.
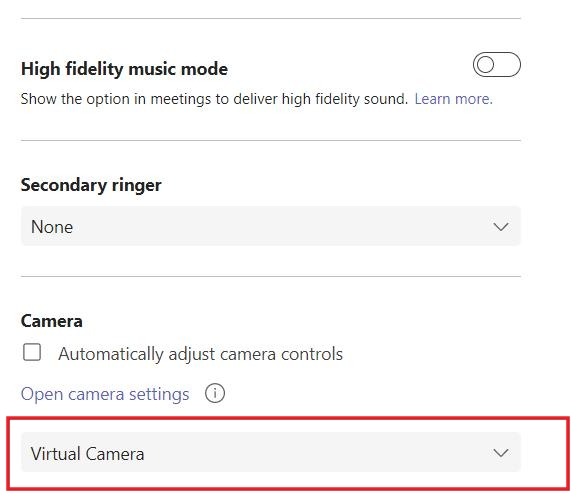
Under the Camera section, check whether the correct camera is shown. If not, click the drop-down box underneath to select the correct camera model, and check the image in preview.
6. Reinstall Microsoft Teams App
If the above troubleshooting steps haven’t helped, and your camera still isn’t working with Teams, try reinstalling the app. First, uninstall the app by going to Settings -> Apps -> Installed apps. Once the app has been removed, navigate to the Microsoft Store, and download the app again.
Tip: check alternative methods of uninstalling apps on Windows.
If you’re new to using Teams, learn how to create a new team in Microsoft Teams. Also, check out or download a list of the most commonly used keyboard shortcuts for Microsoft Teams on Windows.
Image credit: Unsplash. All screenshots by Meenatchi Nagasubramanian
Our latest tutorials delivered straight to your inbox