
Ever felt overwhelmed trying to add a contact form to your WordPress site? You’re not alone. This guide cuts through the confusion, showing you a straightforward method to set up a WordPress contact form, all without any coding hassle.
Choose a Good Plugin to Set Up a WordPress Contact Form
When setting up a contact form on your WordPress website, the first step is to choose a good plugin. Yes, it’s technically possible to create a contact form without a plugin, but it’s a bit of a hassle, as you only have the following two options:
- Code a contact form from scratch: you can create a contact form using HTML for structure, CSS for styling, PHP for server-side processing, and JavaScript for enhanced user interaction. This method requires a good grasp of these programming languages and substantial time investment, so it’s not a good option for WordPress administrators who just want a quick and efficient solution.
- Third-Party Online Form Builders: tools like Jotform or Basin let you design a form on the platforms and embed it into your WordPress site. While more accessible than coding, embedded third-party forms can slow down your site, have limitations in customization, and involve depending on external services for critical functionalities.
Given the challenges associated with coding a contact form from scratch and the limitations of relying on third-party online form builders, using a WordPress contact form plugin is typically the best approach.
Plugins offer a perfect balance by providing ease of use, customization, and integration that hand-coding and third-party services often lack. They are designed to be user-friendly, require no coding knowledge, and come with a variety of design and functionality options to match your specific needs.
Top Contact Form Plugins for WordPress
In your quest to add a contact form to your WordPress site, it’s crucial to choose the right plugin. We’ve done the legwork and researched the best contact form plugins. While each of these plugins can get the job done efficiently, they do have their unique features and slight differences. Below is a rundown to help you decide which one fits your needs best:
- Contact Form 7: this plugin is a staple for WordPress users. It’s free, lightweight, and straightforward, allowing multiple forms, with easy customization, using simple markup. It supports Ajax-powered submitting and CAPTCHA spam filtering. While it doesn’t save submissions to the database by default, add-ons are available for this functionality, and you probably don’t need it anyway.
- WPForms: WPForms is perfect for creating responsive, beautiful contact forms, feedback forms, subscription forms, and more in minutes. The plugin has been around for a long time, and it currently has a rating of 4.9 stars out of 5, so you know that it does its job well. Unfortunately, the free version is very limited, and the full range of features requires a subscription.
- Gravity Forms: For those needing complex forms with conditional logic or multiple options, Gravity Forms is a good choice. It offers an intuitive visual form editor and supports various transactions, but its comprehensive features may still be overwhelming for beginners with simple form needs. There’s no free version of Gravity Forms, but you can try a fully-functioning online demo.
- Ninja Forms: Ideal for non-techies, Ninja Forms offers a drag-and-drop builder, multipage forms, and file uploads. It’s user-friendly and has a dedicated support team, though some advanced features require purchasing premium add-ons or one of three available paid subscription plans.
- Jetpack Form: If you’re already using the Jetpack plugin, which provides a wealth of security, performance, and growth tools for WordPress sites, using Jetpack Form is a natural choice. This integration simplifies your workflow, as you won’t need to install another plugin. However, we don’t recommend installing Jetpack solely for its form capabilities, as the plugin can be quite resource-intensive and may slow down your site.
Steps to Install and Configure a Contact Form Plugin in WordPress
Setting up a contact form plugin requires a few simple steps. We’re using Contact Form 7 for this demonstration, but the process is largely the same regardless of the plugin you choose.
Install and Activate the Contact Form Plugin
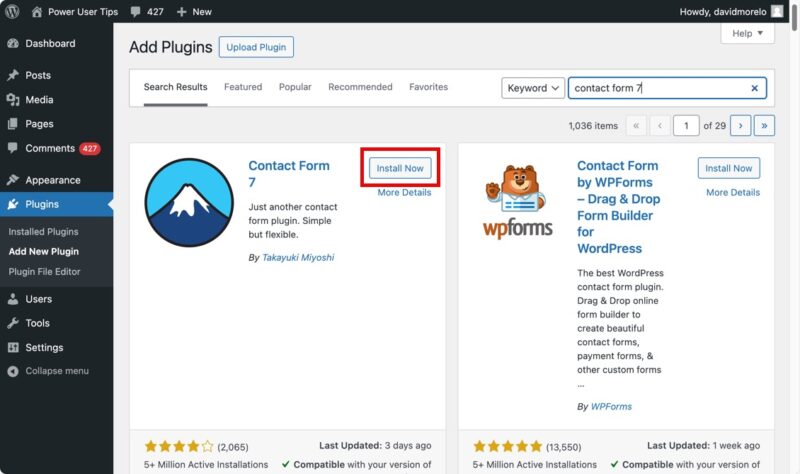
Head to your WordPress admin dashboard, click on Plugins -> Add New Plugin, and search for “Contact Form 7.” Hit the Install Now button next to the plugin, and once it’s installed, click Activate.
Display the Default Contact Form
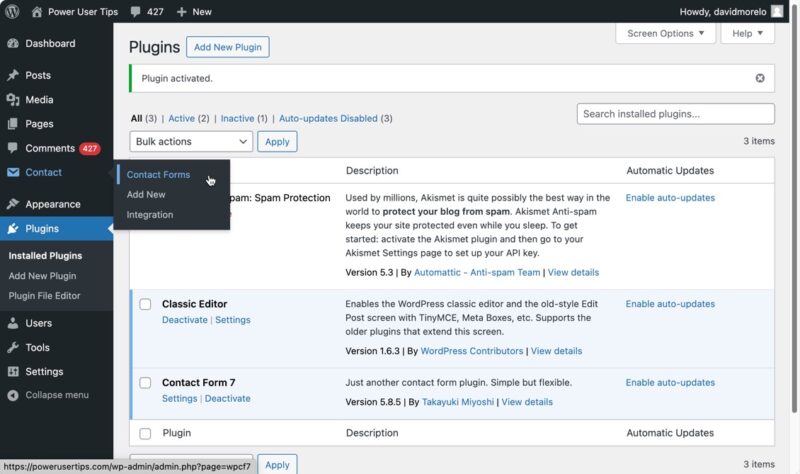
Let’s put that form on your page. In your WordPress admin screen, navigate to Contact -> Contact Forms. You’ll find a default form named “Contact form 1,” along with a shortcode that looks like this: [contact-form-7 id="1234" title="Contact form 1"].
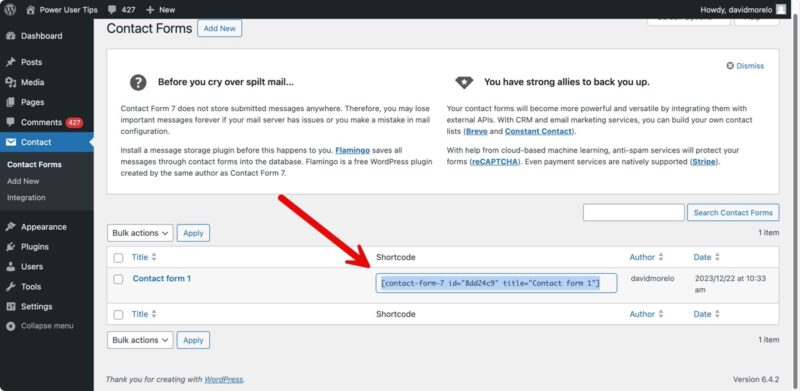
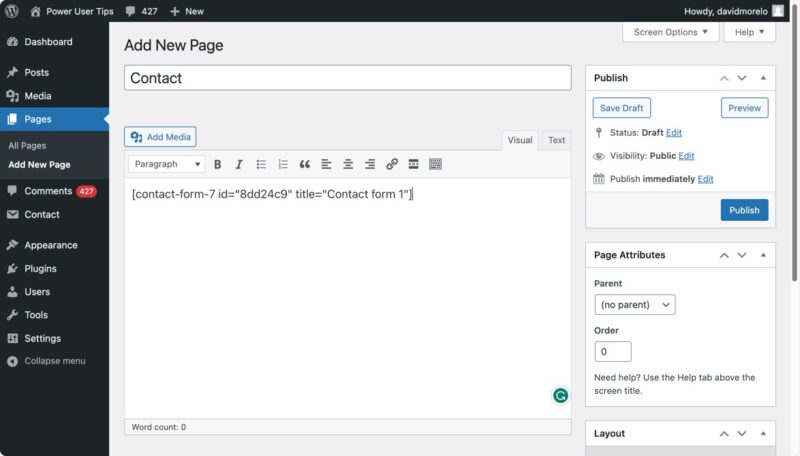
Copy this shortcode. Next, go to Pages -> All Pages, and open the page where you want your form – maybe it’s a page you’ve titled “Contact.” Paste the shortcode into the content area of your page, and just like that, your form is live!
Customize Your Form
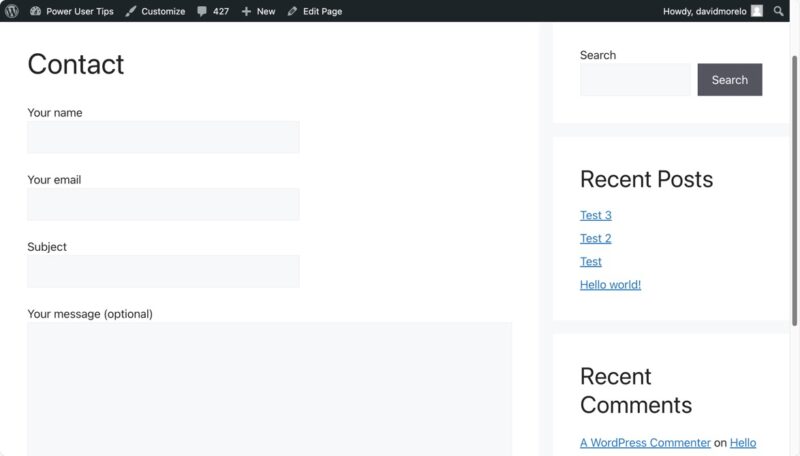
The default form is pretty basic, so let’s customize it. Return to the Contact -> Contact Forms menu, and click on your form to edit it. You’ll see the form template in the Form tab.
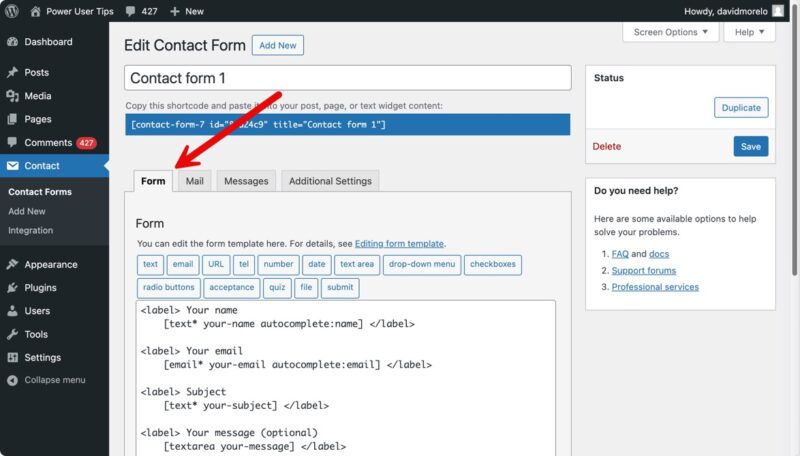
You can add new fields to your form. For instance, if you want to add a drop-down menu or a checkbox, use the tag-generator tools provided. These tools help you create new tags without needing to learn the syntax.
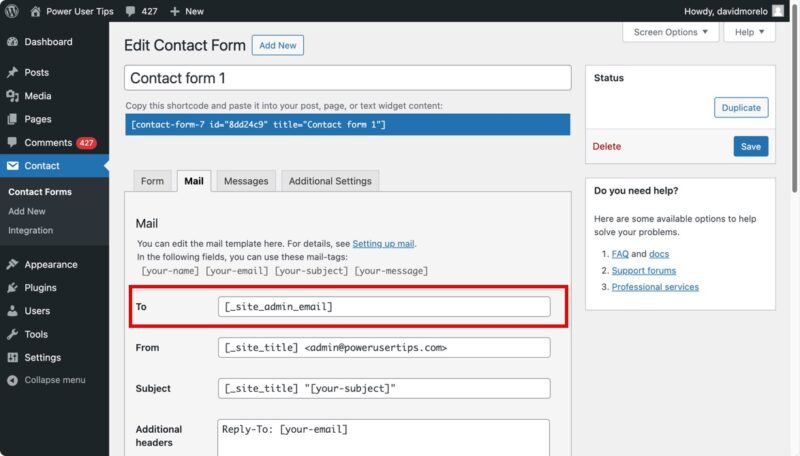
You should also navigate to the Mail tab to customize your mail template. We recommend you put [_site_admin_email] in the To field so that all messages sent using the contact form reach your primary admin email address. If configured incorrectly, contact form messages won’t be able to reach you.
Configure SMTP for Reliable Email Delivery (Optional)
If you are having trouble with email delivery after setting up your contact form, it’s likely because WordPress, by default, uses the PHP mail() function for sending out emails. This includes emails from your contact form, like confirmations and responses.
The problem with PHP mail() is that it often leads to deliverability issues, with messages failing to reach their intended recipients or landing in spam folders. Fortunately, SMTP (Simple Mail Transfer Protocol) plugins like WP Mail SMTP can save the day by allowing you to easily reconfigure WordPress to use a proper SMTP provider when sending emails, such as Gmail, Microsoft, Zoho, or your web host’s email service.
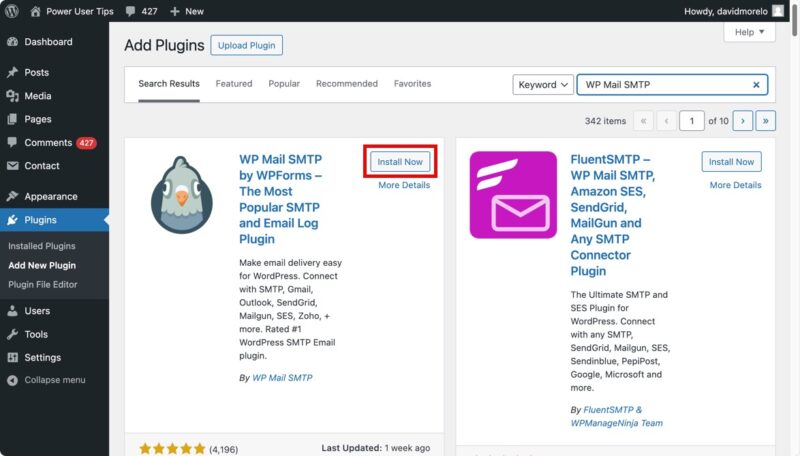
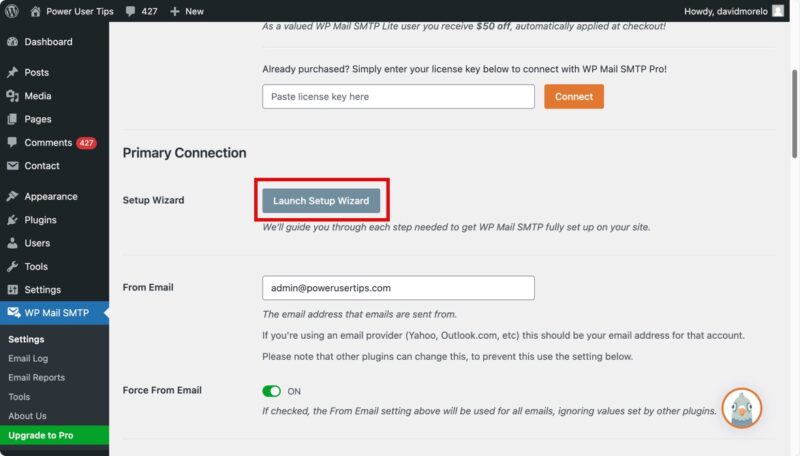
Simply install and activate the WP Mail SMTP plugin through Plugins -> Add New in your WordPress dashboard. Once activated, open the plugin, and click Launch Setup Wizard in the left pane. This user-friendly wizard will guide you in selecting your SMTP mail provider and entering the necessary credentials.
Tip: Read our detailed article on how to configure WordPress to send SMTP mail for more information.
With these steps, you should have a fully functional and customized contact form on your WordPress site. Now that your WordPress setup has evolved slightly, it may be a good time to customize the WordPress admin dashboard so that you can see all important information at a glance.
Image credit: Unsplash. All screenshots by David Morelo.
Our latest tutorials delivered straight to your inbox